
5.3: Creating a Monster Phylogeny
- Page ID
- 138524
\( \newcommand{\vecs}[1]{\overset { \scriptstyle \rightharpoonup} {\mathbf{#1}} } \) \( \newcommand{\vecd}[1]{\overset{-\!-\!\rightharpoonup}{\vphantom{a}\smash {#1}}} \)\(\newcommand{\id}{\mathrm{id}}\) \( \newcommand{\Span}{\mathrm{span}}\) \( \newcommand{\kernel}{\mathrm{null}\,}\) \( \newcommand{\range}{\mathrm{range}\,}\) \( \newcommand{\RealPart}{\mathrm{Re}}\) \( \newcommand{\ImaginaryPart}{\mathrm{Im}}\) \( \newcommand{\Argument}{\mathrm{Arg}}\) \( \newcommand{\norm}[1]{\| #1 \|}\) \( \newcommand{\inner}[2]{\langle #1, #2 \rangle}\) \( \newcommand{\Span}{\mathrm{span}}\) \(\newcommand{\id}{\mathrm{id}}\) \( \newcommand{\Span}{\mathrm{span}}\) \( \newcommand{\kernel}{\mathrm{null}\,}\) \( \newcommand{\range}{\mathrm{range}\,}\) \( \newcommand{\RealPart}{\mathrm{Re}}\) \( \newcommand{\ImaginaryPart}{\mathrm{Im}}\) \( \newcommand{\Argument}{\mathrm{Arg}}\) \( \newcommand{\norm}[1]{\| #1 \|}\) \( \newcommand{\inner}[2]{\langle #1, #2 \rangle}\) \( \newcommand{\Span}{\mathrm{span}}\)\(\newcommand{\AA}{\unicode[.8,0]{x212B}}\)
Creating a Monster Phylogeny
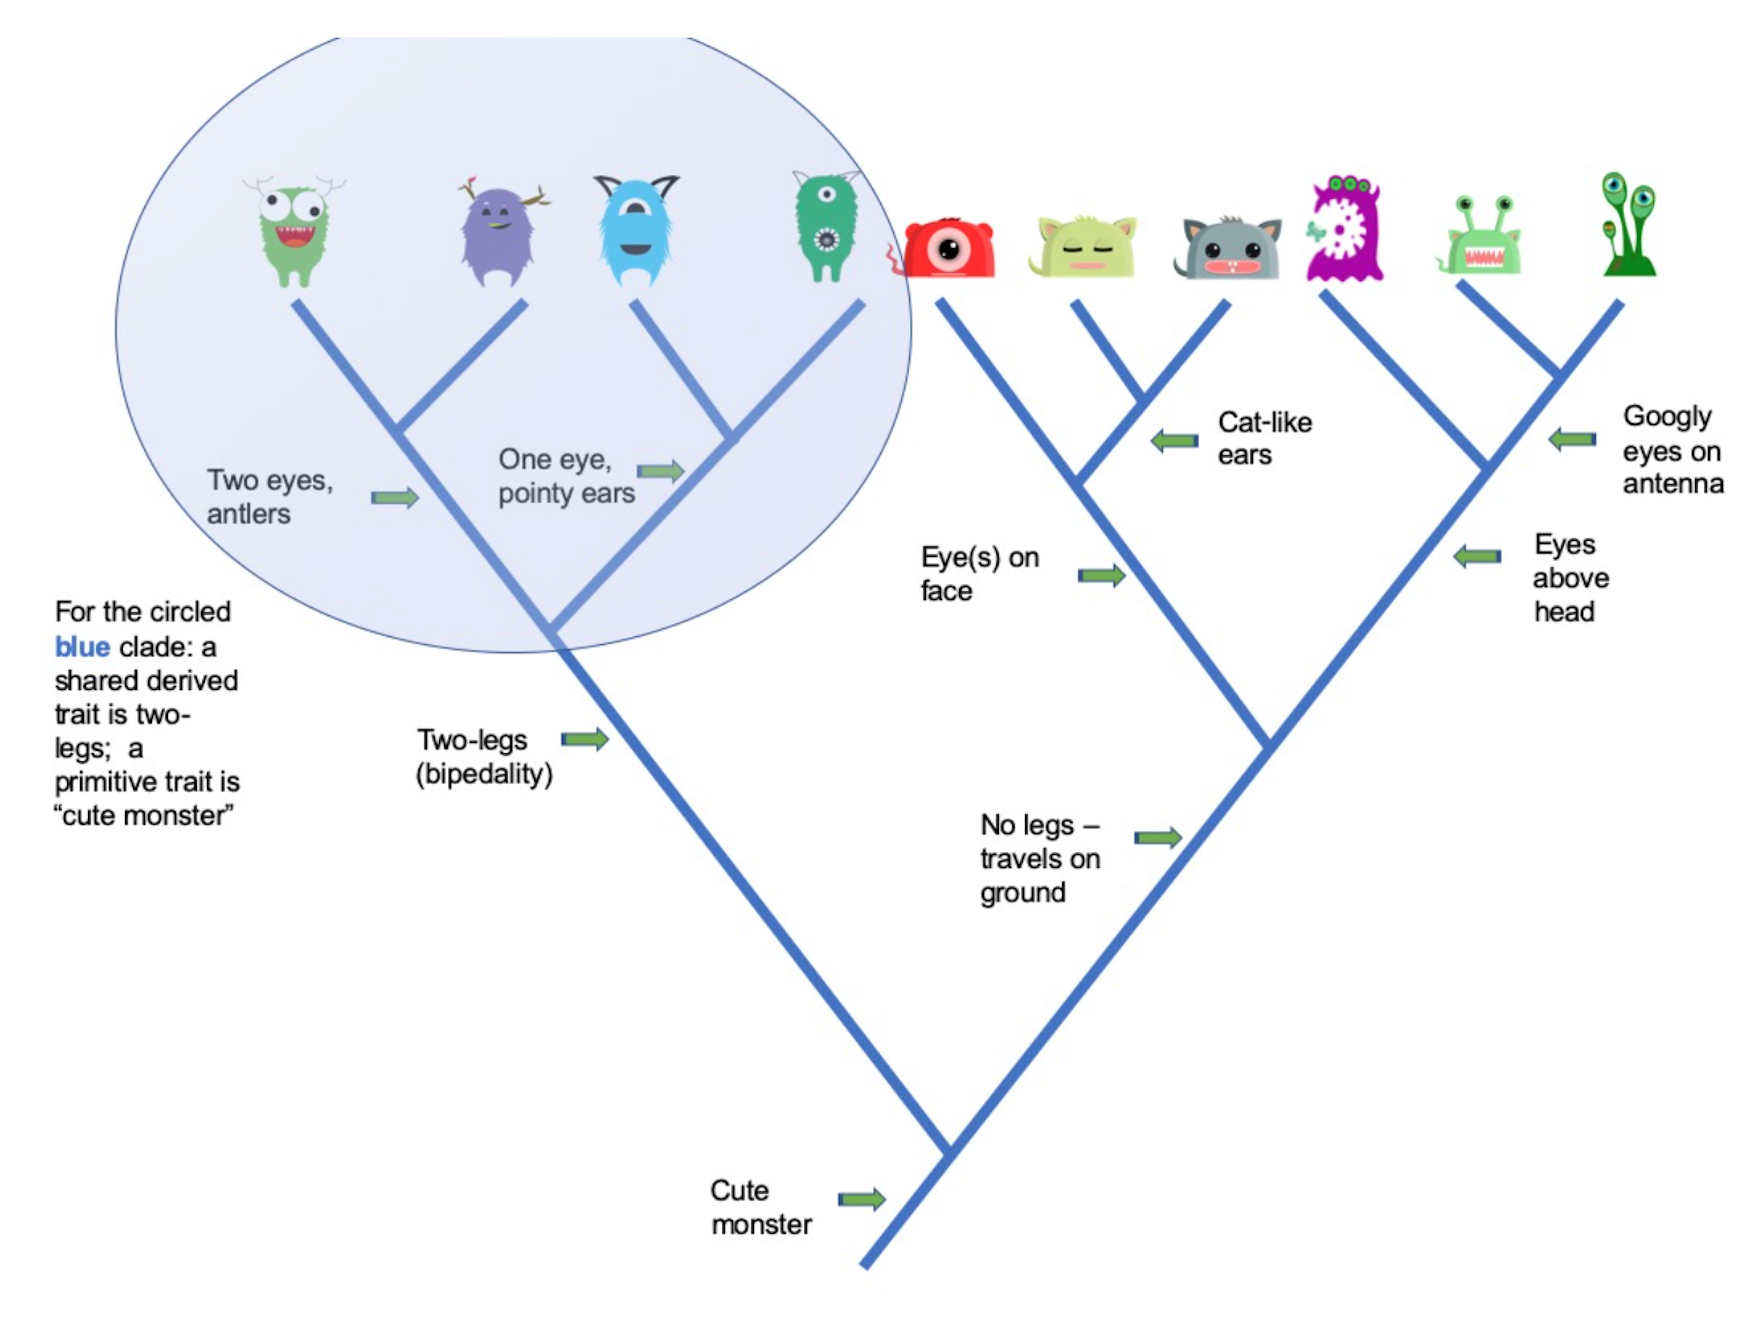
Part of a “monster phylogeny,” showing where horns evolved.

Learning Objectives
- Identify traits of characters and place them into a student-defined hierarchy to create a classification key
- Draw a corresponding phylogeny (evolutionary tree) for the characters
- Identify clades and corresponding primitive and derived characteristics using the phylogeny
Supplies Needed
- Ten imaginary character cards/tiles per group (each group can have the same set of ten or a unique assortment). Characters (attached) can be printed on cardstock or laminated, or tiles from a child’s memory/matching game can be used.
- Pencils with erasers
- Colored markers
- Blank paper
- Rulers (optional)
- Student worksheet (attached)
Readings
- Etting, Stephanie. 2019. Chapter 5: Meet the Living Primates. Explorations.
Introduction
Steps
- This activity may be assigned as either an individual or small group activity.
- Instructors will distribute 10 character images to each student or small group. Each group can have the same set of 10, or each group can have a unique assortment of characters (this is often more enjoyable). Printables (attached) can be printed (on cardstock or laminated), or tiles from a child’s memory/matching game can be used. It is not recommended to use images of real animals as students may feel pressured to select the “right” biological answer. Instead, students should be encouraged to be creative.There is no perfect phylogenetic answer. This lab is more about experiencing the process and learning the concepts.
- Before the activity, the instructor should spend some time introducing what phylogenies are and how they are drawn and labeled. Some of this information is provided in the “background” section of the student worksheet (attached).
- The instructor should also review how to identify clades and primitive and derived characteristics. It can be beneficial to go through a simple example ahead of time, articulating the expectations for how to circle clades, write in where traits evolved, and identify primitive and derived traits.
- Using the cards and the instructions in the student worksheet (attached), students develop a classification key and a corresponding phylogeny. This phylogeny should be appropriately labeled. Lastly, students will circle some clades and identify primitive and derived traits.
- Instructors should collect the students’ phylogenies to check for accuracy. Afterward, they should go through an abbreviated version of one of the phylogenies (or use the example attached) and check for students’ understanding of primitive and derived traits. Do not reveal the example to the students before they turn in their phylogenies, as it may bias their work.
Review Questions
- What is the meaning of “phylogeny”?
- Which characteristics did you focus on when you were developing your tree? Why? In this case we don’t know in what order the traits evolved in this group of taxa (they are fictional!). However, biologists want their phylogenies to reflect evolutionary history. What clues do biologists use to help them identify the order in which these traits evolved?
- How would your phylogeny change if you chose to focus on different aspects?
- What have you found to be the most helpful way to distinguish between primitive and derived traits for a given clade? Briefly describe how one trait on your phylogeny could be both a primitive and a derived trait.
Adapting for Online Learning
For Further Exploration
References
Image Attributions
Example Phylogeny for Instructor
Creating a Monster Phylogeny: Worksheet
Background


Steps
To Build the Classification Key
- Lay out the 10 characters in front of you. Identify a character trait(s) that divides the 10 characters into two groups, for example: two legs versus four legs or green versus blue. The 10 characters do not need to be divided exactly in half; dividing them into one small and one large group based on the trait you select is equally fine. The precise trait(s) you select is not critical for this activity; what matters is that your categorization is strong. Take careful notes along the way to document the new groups you made and the traits you used to divide them.
Example: Green versus Blue
- Repeat the process with each of the small groups, selecting a new trait each time. For example, you could now divide the green group by those with horns and those without. The number of individuals in each group does not matter—a group of five could be divided into one and four, or two and three. Again, take careful notes along the way to document the new groups you made and the trait(s) you used to divide them.
Example: Horns versus No Horns
- Continue dividing up all subgroups with two or more imaginary characters until each individual can be classified as unique by the traits it possesses. Again, take careful notes along the way!
- Now write out a simple key—it does not need to be perfect but it must be legible and clearly represent each of the divisions of your characters. At the bottom of the key, where all individuals have been separated, it may be helpful to give each character a name to help you distinguish it on both the key and the phylogeny. Here is an example of a key. Be sure to include the derived traits that you use to divide your characters next to the brackets.

To Build the Phylogeny
- Using a pencil and a new blank sheet of paper organized on a landscape layout (so the long edge is horizontal), list all 10 characters across the top of the page in the same order that they were at the bottom of your key (left to right). You may draw them or use an identifying name (e.g., green three-eyed monster).
- Starting just below the characters, draw lines down to connect the characters who are most closely related (share the most traits and were the last to be separated in the key.)


 |
 |
 |
 |
 |
 |
 |
 |
 |
 |
 |
 |
 |
 |
 |
 |
 |
 |
 |
 |
 |
 |
 |
 |
|
|
 |
 |
 |
 |
 |
