
9.4: Note-Taking Strategies
- Last updated
- Save as PDF
- Page ID
- 24286
Introduction
One way to understand note taking is to realize that taking notes is just one part of the process. Effective note taking consists of three parts: observing, recording, and reviewing.
- Observe an event. This part can be a statement by an instructor, a lab experiment, a slide show of an artist’s works, or a chapter of required reading.
- Record your observations of that event. This part means take notes.
- Review what you have recorded. Memorize, reflect, apply, and rehearse what you’re learning. This part lifts ideas off the page and turns them into a working part of your mind.
Each part of the note-taking process is essential, and each depends on the other. Your observations determine what you record. What you record determines what you review. And the quality of your review can determine how effective your next observations will be. If you review your notes on the Sino-Japanese War of 1894, for example, the next day’s lecture on the Boxer Rebellion of 1900 will make more sense.
Legible and speedy handwriting is also useful in taking notes. Knowledge of outlining is handy too. A nifty pen, a new notebook, and a laptop computer are all great note-taking devices.
But they’re all worthless—unless you participate as an energetic observer in class and regularly review your notes after class. If you take those two steps, you can turn even the most disorganized chicken scratches into a powerful tool.
This is a well-researched aspect of student success in higher education. Study after study points to the benefits of taking notes. The value is added in two ways. First, you gather a set of materials that refreshes your memory and helps you prepare for tests. Second, you are prompted to listen effectively during class.
You translate new ideas into your own words and images. You impose a personal and meaningful structure on what you see, read, and hear. You move from passive observer to active participant (Brazeau 2006). It’s not that you take notes so that you can learn from them later. Instead, you learn while taking notes.
Computer technology takes traditional note taking to a whole new level. You can capture key notes with word processing, outlining, database, and publishing software. Your notes become living documents that you can search, bookmark, tag, and archive like other digital files.
Sometimes, note-taking looks like a passive affair, especially in large lecture classes. One person at the front of the room does most of the talking. Everyone else is seated and silent, taking notes. The lecturer seems to be doing all of the work.
Don’t be deceived. Look more closely. You’ll see some students taking notes in a way that radiates energy. They’re awake and alert, poised on the edge of their seats. They’re writing—a physical activity that expresses mental engagement. These students listen for levels of ideas and information, make choices about what to record, and compile materials to review.
In higher education, you might spend hundreds of hours taking notes. Making them more effective is a direct investment in your success.
Think of your notes as a textbook that you create—one that’s more current and more in tune with your learning preferences than any textbook you could buy.
Note-Taking—Observe
Sherlock Holmes, a fictional master detective and student of the obvious, could track down a villain by observing the fold of his scarf and the mud on his shoes. In real life, a doctor can save a life by observing a mole—one a patient has always had—that undergoes a rapid change.
Keen observers see facts and relationships. They know ways to focus their attention on the details and then tap their creative energy to discover patterns.
To sharpen your classroom observation skills, experiment with the following techniques:
Complete outside assignments. The more familiar you are with a subject, the more easily you can absorb important information during class lectures. Instructors usually assume that students complete assignments, and they construct their lectures accordingly.
Sit front and center. Students who get as close as possible to the front and center of the classroom often do better on tests for several reasons. The closer you sit to the lecturer, the harder it is to fall asleep. The closer you sit to the front, the fewer interesting or distracting classmates are situated between you and the instructor. Material on the board is easier to read from up front. Also, the instructor can see you more easily when you have a question.
Sitting close to the front is a way to commit yourself to getting what you want out of school. One reason students gravitate to the back of the classroom is that they think the instructor is less likely to call on them. Sitting in back can signal a lack of commitment. When you sit up front, you are declaring your willingness to take a risk and participate.
Conduct a short preclass review. Arrive early, and then put your brain in gear by reviewing your notes from the previous class. Scan your reading assignment. Look at the sections you have underlined or highlighted. Review assigned problems and exercises. Note questions you intend to ask.
Observe—Be Attentive in Class
Part of preparing to take notes is being observant about your own responses and reactions to what is going on in class. For example, sometimes your mind may wander, you might hear the instructor say something you disagree with, or you may feel sleepy during a lecture. These can be huge distractions to you while you listen. However, how you react when these situations happen will make all the difference in your ability to remain attentive in class.
Accept your wandering mind. Don’t fight daydreaming. When you notice your mind wandering during class, look at it as an opportunity to refocus your attention. If thermodynamics is losing out to beach parties, let go of the beach.
Be with the instructor. In your mind, put yourself right up front with the instructor. Imagine that you and the instructor are the only ones in the room and that the lecture is a personal conversation between the two of you. Pay attention to the instructor’s body language and facial expressions. Look the instructor in the eye.
Remember that the power of this suggestion is immediately reduced by digital distractions— Internet surfing, e-mail checking, text messaging, or reading social media feeds. Taking notes is a way to stay focused. The physical act of taking notes signals your mind to stay in the same room as the instructor.
Postpone debate. When you hear something you disagree with, note your disagreement and let it go. Don’t allow your internal dialogue to drown out subsequent material. If your disagreement is persistent and strong, make note of it and then move on. Internal debate can prevent you from absorbing new information. It’s okay to absorb information you don’t agree with. Just absorb it with the mental tag My instructor says ... and I don’t agree with it.
Let go of judgments about lecture styles. Human beings are judgment machines. We evaluate everything, especially other people. If another person’s eyebrows are too close together (or too far apart), if she walks a certain way or speaks with an unusual accent, we instantly make up a story about her. We do this so quickly that the process is usually not a conscious one.
Don’t let your attitude about an instructor’s lecture style, habits, or appearance get in the way of your education. You can decrease the power of your judgments if you pay attention to them and let them go.
You can even let go of judgments about rambling, unorganized lectures. Turn them to your advantage. Take the initiative and organize the material yourself. While taking notes, separate the key points from the examples and supporting evidence. Note the places where you got confused, and make a list of questions to ask.
Participate in class activities. Ask questions. Volunteer for demonstrations. Join in-class discussions. Be willing to take a risk or look foolish, if that’s what it takes for you to learn. Chances are, the question you think is dumb is also on the minds of several of your classmates.
Relate the class to your goals. If you have trouble staying awake in a particular class, write at the top of your notes how that class relates to a specific goal. Identify the reward or payoff for reaching that goal.
Think critically about what you hear. This suggestion might seem contrary to the postpone debate technique. It’s not. You might choose not to think critically about the instructor’s ideas during the lecture. That’s fine. Do it later, as you review and edit your notes. This is the time to list questions or write down your agreements and disagreements.
Observe—What to Watch for in Class
Another important element to taking notes is knowing what to observe in class. During class, you want to listen and look for the instructor cues that help you recognize the important information to know.
The following suggestions will help you look for clues as to the important material to know.
Be alert to repetition. When an instructor repeats a phrase or an idea, make a note of it. Repetition is a signal that the instructor thinks the information is important.
Listen for introductory, concluding, and transition words and phrases. Examples include phrases such as the following three factors, in conclusion, the most important consideration, in addition to, and on the other hand. These phrases and others signal relationships, definitions, new subjects, conclusions, cause and effect, and examples. They reveal the structure of the lecture. You can use these phrases to organize your notes.
Watch the board or PowerPoint presentation. If an instructor takes the time to write something on the board or show a PowerPoint presentation, consider the material to be important. Copy all diagrams and drawings, equations, names, places, dates, statistics, and definitions.
Watch the instructor’s eyes. If an instructor glances at her notes and then makes a point, it is probably a signal that the information is especially important. Anything she reads from her notes is a potential test question.
Highlight the obvious clues. Instructors often hint strongly or tell students point-blank that certain information is likely to appear on an exam. Use stars or other special marks in your notes next to this information. Instructors are not trying to hide what’s important.
Notice the instructor’s interest level. If the instructor is excited about a topic, it is more likely to appear on an exam. Pay attention when he seems more animated than usual.
Attend class. For most courses, you’ll benefit by attending every class session. This allows you to observe and actively participate. If you miss a class, then catch up as quickly as possible. Find additional ways to observe class content.
Clarify policies on missed classes. On the first day of classes, find out about your instructors’ policies on absences. See whether you will be allowed to make up assignments, quizzes, and tests. Also inquire about doing extra-credit assignments.
Contact a classmate. Early in the semester, identify a student in each class who seems responsible and dependable. Exchange e-mail addresses and phone numbers. If you know you won’t be in class, contact this student ahead of time. When you notice that your classmate is absent, pick up extra copies of handouts, make assignments lists, and offer copies of your notes.
Contact your instructor. If you miss a class, e-mail or call your instructor, or put a note in his mailbox. Ask whether he has another section of the same course that you can attend so that you won’t miss the lecture information. Also ask about getting handouts you might need before the next class meeting.
Use technology. If there is a website for your class, check it for assignments and the availability of handouts you missed. Free online services allow students to share notes with one another.
These services use wiki software, which allows you to create and edit webpages using any browser. Before using such tools, however, check with instructors for their policies on notes sharing.
Record—Techniques for Effective Note-Taking, Part 1
The format and structure of your notes are more important than how fast you write or how elegant your handwriting is. You want to use the method that works best for you so that they make sense when you go back and review them. One method you can try is to use key words to help you take effective and meaningful notes.
Use key words. An easy way to sort the extraneous material from the important points is to take notes using key words. Key words or phrases contain the essence of communication. They include the following:
- Concepts, technical terms, names, and numbers
- Linking words, including words that describe action, relationship, and degree (for example, most, least, and faster)
Key words evoke images and associations with other words and ideas. They trigger your memory. That characteristic makes them powerful review tools. One key word can initiate the recall of a whole cluster of ideas. A few key words can form a chain from which you can reconstruct an entire lecture.
To see how key words work, take yourself to an imaginary classroom. You are now in the middle of an anatomy lecture. Picture what the room looks like, what it feels like, how it smells. You hear the instructor say:
- Okay, what happens when we look directly over our heads and see a piano falling out of the sky? How do we take that signal and translate it into the action of getting out of the way? The first thing that happens is that a stimulus is generated in the neurons—receptor neurons—of the eye. Light reflected from the piano reaches our eyes. In other words, we see the piano.
- The receptor neurons in the eye transmit that sensory signal—the sight of the piano—to the body’s nervous system. That’s all they can do—pass on information. So we’ve got a sensory signal coming into the nervous system. But the neurons that initiate movement in our legs are effector neurons. The information from the sensory neurons must be transmitted to effector neurons, or we will get squashed by the piano. There must be some kind of interconnection between receptor and effector neurons. What happens between the two? What is the connection?
Key words, as you might note in this example, include stimulus, generated, receptor neurons, transmit, sensory signals, nervous system, effector neurons, and connection. You can reduce the instructor’s 163 words to these 12 key words. With a few transitional words, your notes might look like this:
- Note the last key word of the lecture: connection. This word is part of the instructor’s question and leads to the next point in the lecture. Be on the lookout for questions like this. They can help you organize your notes and are often clues for test questions.
Record—Techniques for Effective Note-Taking, Part 2
If key words do not work for you as a method of note-taking, you might try one of the following strategies:
Use pictures and diagrams. Make relationships visual. Copy all diagrams from the board, and invent your own. A drawing of a piano falling on someone who is looking up, for example, might be used to demonstrate the relationship of receptor neurons to effector neurons. Label the eyes receptor and the feet effector. This picture implies that the sight of the piano must be translated into a motor response. By connecting the explanation of the process with the unusual picture of the piano falling, you can link the elements of the process together.
Write notes in paragraphs. When it is difficult to follow the organization of a lecture or put information into outline form, create a series of informal paragraphs. These paragraphs should contain few complete sentences. Reserve complete sentences for precise definitions, direct quotations, and important points that the instructor emphasizes by repetition or other signals— such as the phrase This is an important point.
Copy material from the board or PowerPoint presentation. Record key formulas, diagrams, and problems that the teacher presents on the board or in a PowerPoint presentation. Copy dates, numbers, names, places, and other facts. You can even use your own signal or code to flag important material.
Use a three-ring binder. Three-ring binders have several advantages over other kinds of notebooks. First, pages can be removed and spread out when you review. This way, you can get the whole picture of a lecture. Second, the three-ring binder allows you to insert handouts right into your notes. Third, you can insert your own out-of-class notes in the correct order.
Use only one side of a piece of paper. When you use one side of a page, you can review and organize all of your notes by spreading them out side by side. Most students find the benefit well worth the cost of the paper. Perhaps you’re concerned about the environmental impact of consuming more paper. If so, you can use the blank side of old notes and use recycled paper.
Use 3 × 5 cards. As an alternative to using notebook paper, use 3 × 5 cards to take lecture notes. Copy each new concept onto a separate 3 × 5 card.
Keep your own thoughts separate. For the most part, avoid making editorial comments in your lecture notes. The danger is that when you return to your notes, you might mistake your own ideas for those of the instructor. If you want to make a comment, clearly label it as your own.
Use an I’m lost signal. No matter how attentive and alert you are, you might get lost and confused in a lecture. If it is inappropriate to ask a question, record in your notes that you were lost. Invent your own signal—for example, a circled question mark. When you write down your code for I’m lost, leave space for the explanation or clarification that you will get later. The space will also be a signal that you missed something. Later, you can speak to your instructor or ask to see a fellow student’s notes.
Record—Techniques for Effective Note-Taking, Part 3
When choosing an effective note-taking strategy, you might find that one method works best in your math class and another works best in your history class. Experiment with them and use what works best for you.
Here are a few more strategies to choose from that you may find helpful:
Label, number, and date all notes. Develop the habit of labeling and dating your notes at the beginning of each class. Number the page, too. Sometimes, the sequence of material in a lecture is important. Write your name and phone number in each notebook in case you lose it.
Use standard abbreviations. Be consistent with your abbreviations. If you make up your own abbreviations or symbols, write a key explaining them in your notes. Avoid vague abbreviations. When you use an abbreviation such as comm. for committee, you run the risk of not being able to remember whether you meant committee, commission, common, or commit. One way to abbreviate is to leave out vowels. For example, talk becomes tlk, said becomes sd, American becomes Amrcn.
Leave blank space. Notes tightly crammed into every corner of the page are hard to read and difficult to use for review. Give your eyes a break by leaving plenty of space.
Later, when you review, you can use the blank spaces in your notes to clarify points, write questions, or add other material.
Take notes in different colors. You can use colors as highly visible organizers. For example, you can signal important points with red. Or use one color of ink for notes about the text and another color for lecture notes.
Use graphic signals. The following ideas can be used with any note-taking format:
- Use brackets, parentheses, circles, and squares to group information that belongs together.
- Use stars, arrows, and underlining to indicate important points. Flag the most important points with double stars, double arrows, or double underlines.
- Use arrows and connecting lines to link related groups.
- Use equal signs and greater-than and less-than signs to indicate compared quantities.
- To avoid creating confusion with graphic symbols, write a “dictionary” of your symbols in the front of your notebooks.
Use recorders effectively. Some students record lectures with audio or digital recorders, but there are persuasive arguments against doing so. When you record a lecture, there is a strong temptation to daydream. After all, you can always listen to the lecture again later on. Unfortunately, if you let the recorder do all of the work, you are skipping a valuable part of the learning process.
There are other potential problems as well. Listening to recorded lectures can take a lot of time— more time than reviewing written notes. Recorders can’t answer the questions you didn’t ask in class. Also, recording devices malfunction. In fact, the unscientific Hypothesis of Recording Glitches states that the tendency of recorders to malfunction is directly proportional to the importance of the material. With those warnings in mind, you can use a recorder effectively if you choose. For example, you can use recordings as backups to written notes. (Check with your instructor first. Some prefer not to be recorded.) Turn the recorder on, and then take notes as if it weren’t there. Recordings can be especially useful if an instructor speaks fast.
Record—The Cornell Method
A note-taking system that has worked for students around the world is the Cornell method (Pauk and Owens 2011). Originally developed by Walter Pauk at Cornell University during the 1950s, this approach continues to be taught across the United States and in other countries as well.
The cornerstone of this method is what Pauk calls the cue column—a wide margin on the left side of the paper. The cue column is the key to the Cornell method’s many benefits. Here’s how to use it.
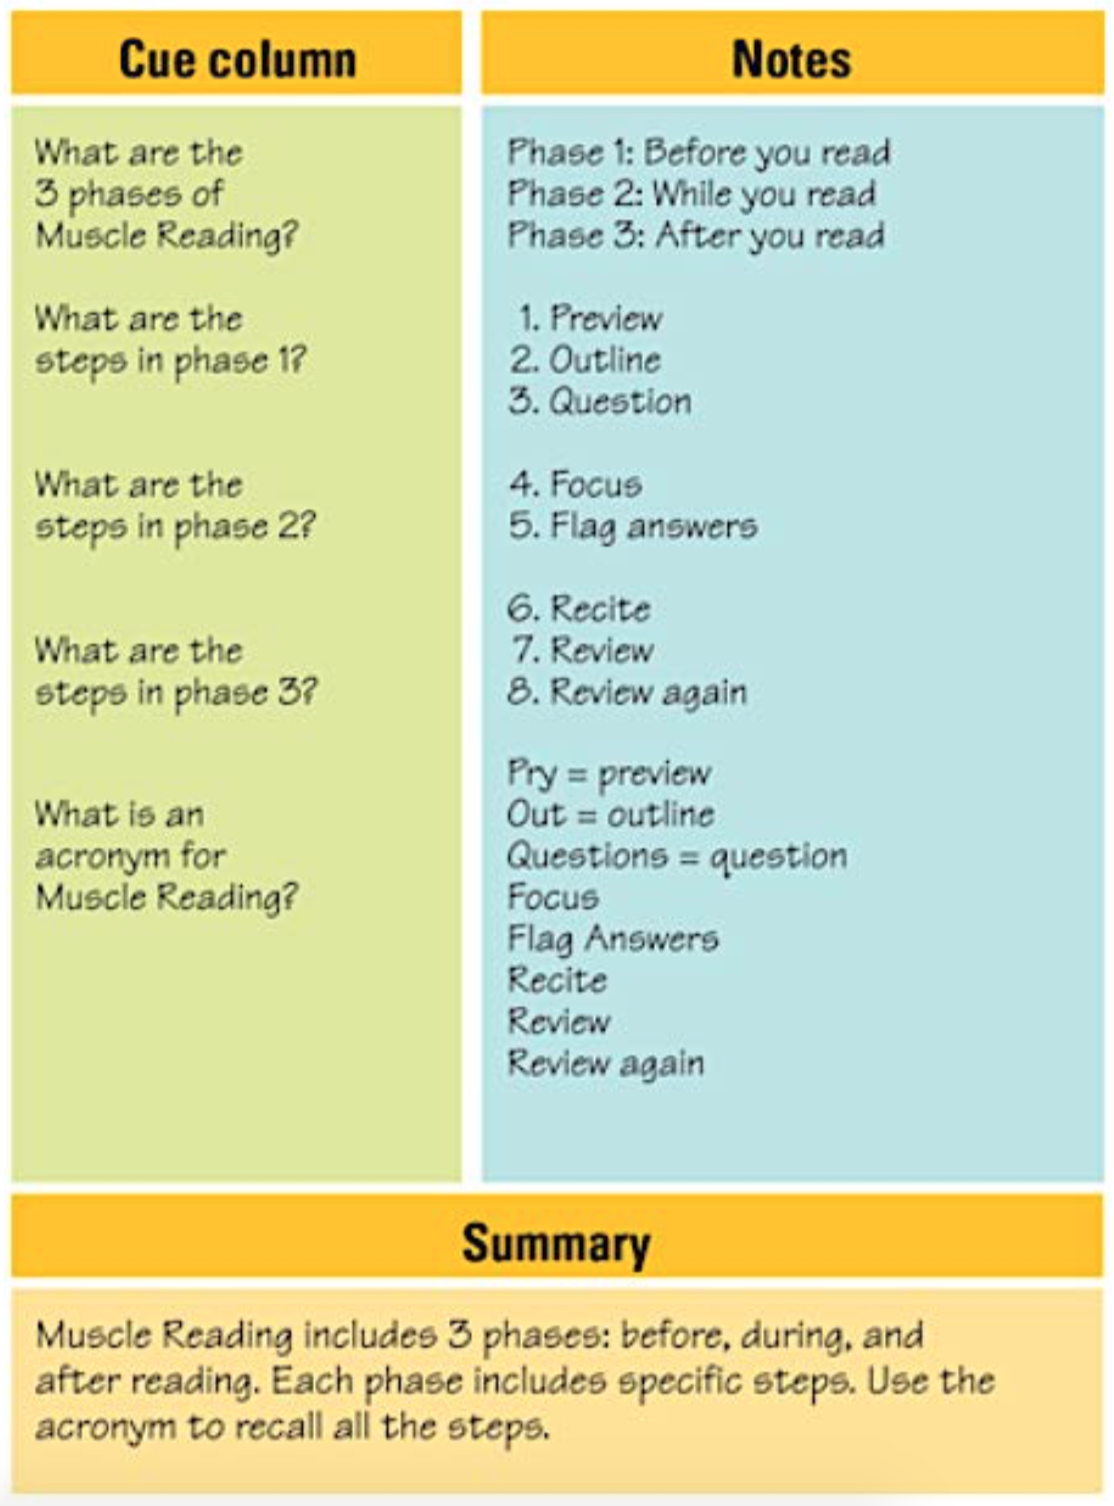
Example Notes Using the Cornell Method
Format your paper. On each sheet, draw a vertical line from top to bottom about 2 inches from the left edge of the paper. This line creates the cue column—the space to the left of the line. You can also find websites that allow you to print out pages in this format. Just do an Internet search using the key words cornell method pdf.
Take notes, leaving the cue column blank. As you read an assignment or listen to a lecture, take notes on the right side of the paper. Fill up this column with sentences, paragraphs, outlines, charts, or drawings. Do not write in the cue column. You’ll use this space later, as you do the next steps.
Condense your notes in the cue column. Think of the notes you took on the right side of the paper as a set of answers. In the cue column, list potential test questions that correspond to your notes. Write one question for each major term or point.
As an alternative to questions, you can list key words from your notes. Another option is to pretend that your notes are a series of articles on different topics. In the cue column, write a newspaper-style headline for each “article.” In any case, be brief. Cramming the cue column full of words defeats its purpose—to reduce the number and length of your notes.
Write a summary. Pauk recommends reducing your notes even more by writing a brief summary at the bottom of each page. This step offers you another way to engage actively with the material.
Use the cue column to recite. Cover the right side of your notes with a blank sheet of paper. Leave only the cue column showing. Then, look at each item you wrote in the cue column and talk about it. If you wrote questions, answer each question. If you wrote key words, define each word and talk about why it’s important. If you wrote headlines in the cue column, explain what each one means and offer supporting details. After reciting, uncover your notes and look for any important points you missed.
Record—Mind Map
Mind mapping, a system developed by Tony Buzan (1991), can be used in conjunction with the Cornell method to take notes. In some circumstances, you might want to use mind maps exclusively.
To understand mind maps, first review the features of traditional note-taking. Outlines (explained in the next section) divide major topics into minor topics, which are subdivided further. They organize information in a sequential, linear way.
The traditional outline reflects only a limited range of brain function—a point that is often made in discussions about left-brain and right-brain activities. People often use the term right brain when referring to creative, pattern-making, visual, intuitive brain activity. They use the term left
brain when talking about orderly, logical, step-by-step characteristics of thought. Writing teacher Gabrielle Rico (2000) uses another metaphor. She refers to the left-brain mode as our sign mind (concerned with words) and the right-brain mode as our design mind (concerned with visuals).
A mind map uses both kinds of brain functions. Mind maps can contain lists and sequences and show relationships. They can also provide a picture of a subject. They work on both verbal and nonverbal levels.
One benefit of mind maps is that they quickly, vividly, and accurately show the relationships between ideas. Also, mind mapping helps you think from general to specific. By choosing a main topic, you focus first on the big picture, then zero-in on subordinate details. By using only key words, you can condense a large subject into a small area on a mind map. You can review more quickly by looking at the key words on a mind map than by reading notes word for word.
Example Notes Using Mind Mapping
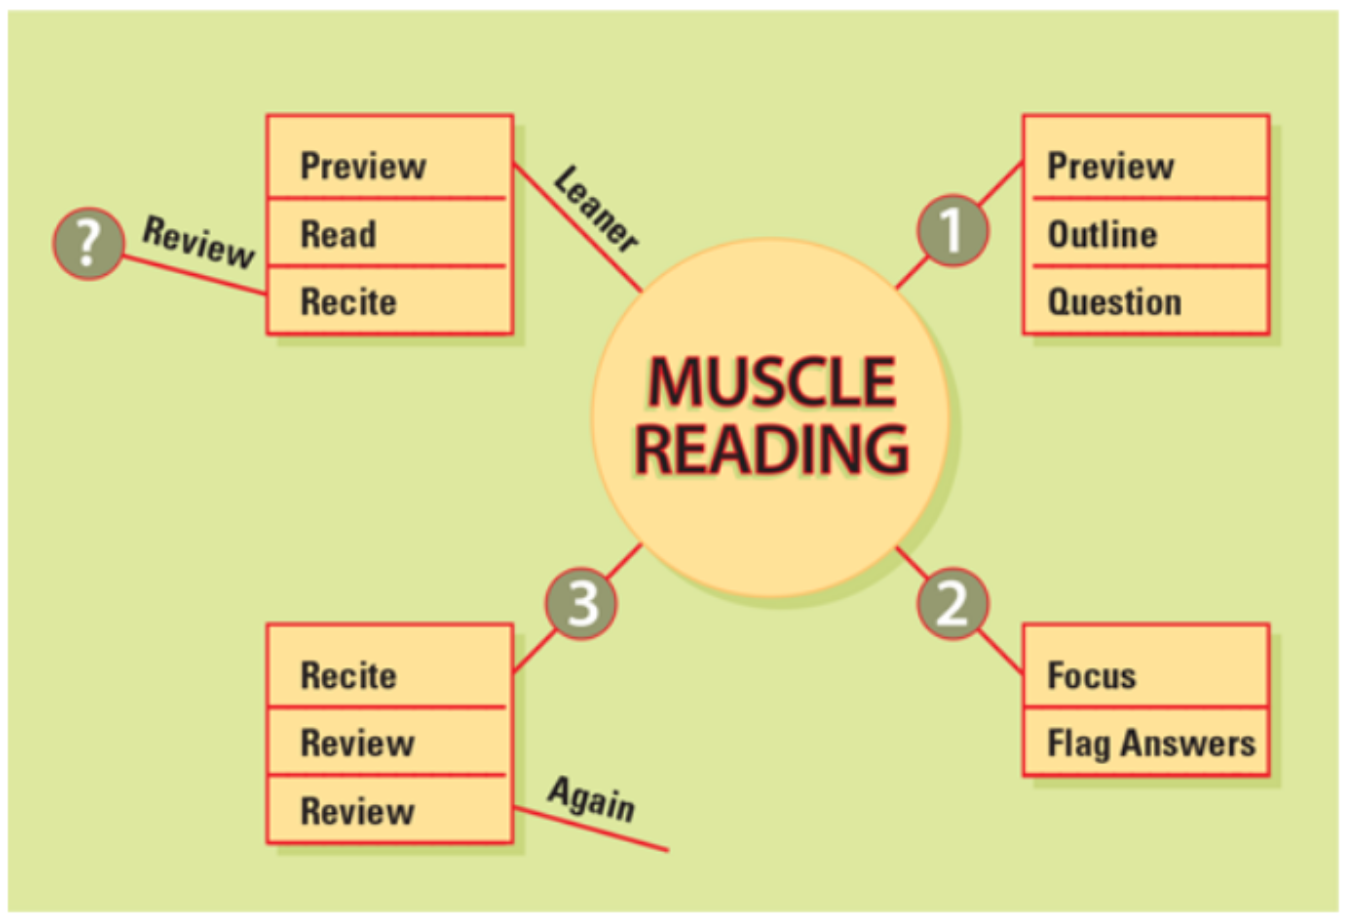
Give yourself plenty of room. To create a mind map, use blank paper that measures at least 11 by 17 inches. If that’s not available, turn regular notebook paper on its side so that you can take notes in a horizontal (instead of vertical) format. If you use a computer in class to take notes, consider software that allows you to create digital mind maps that can include graphics, photos, and URLs.
Determine the main concept of the lecture, article, or chapter. As you listen to a lecture or read, figure out the main concept. Write it in the center of the paper and circle it, underline it, or highlight it with color. You can also write the concept in large letters. Record concepts related to the main concept on lines that radiate outward from the center. An alternative is to circle or box in these concepts.
Use key words only. Whenever possible, reduce each concept to a single word per line or circle or box in your mind map. Although this reduction might seem awkward at first, it prompts you to summarize and to condense ideas to their essence. That means fewer words for you to write now and fewer to review when it’s time to prepare for tests. (Using shorthand symbols and abbreviations can help.) Key words are usually nouns and verbs that communicate the bulk of the speaker’s ideas. Choose words that are rich in associations and that can help you recreate the lecture.
Create links. A single mind map doesn’t have to include all of the ideas in a lecture, book, or article. Instead, you can link mind maps. For example, draw a mind map that sums up the five key points in a chapter, and then make a separate, more detailed mind map for each of those key points. Within each mind map, include references to the other mind maps. This technique helps explain and reinforce the relationships among many ideas. Some students pin several mind maps next to one another on a bulletin board or tape them to a wall. This allows for a dramatic—and effective—look at the big picture.
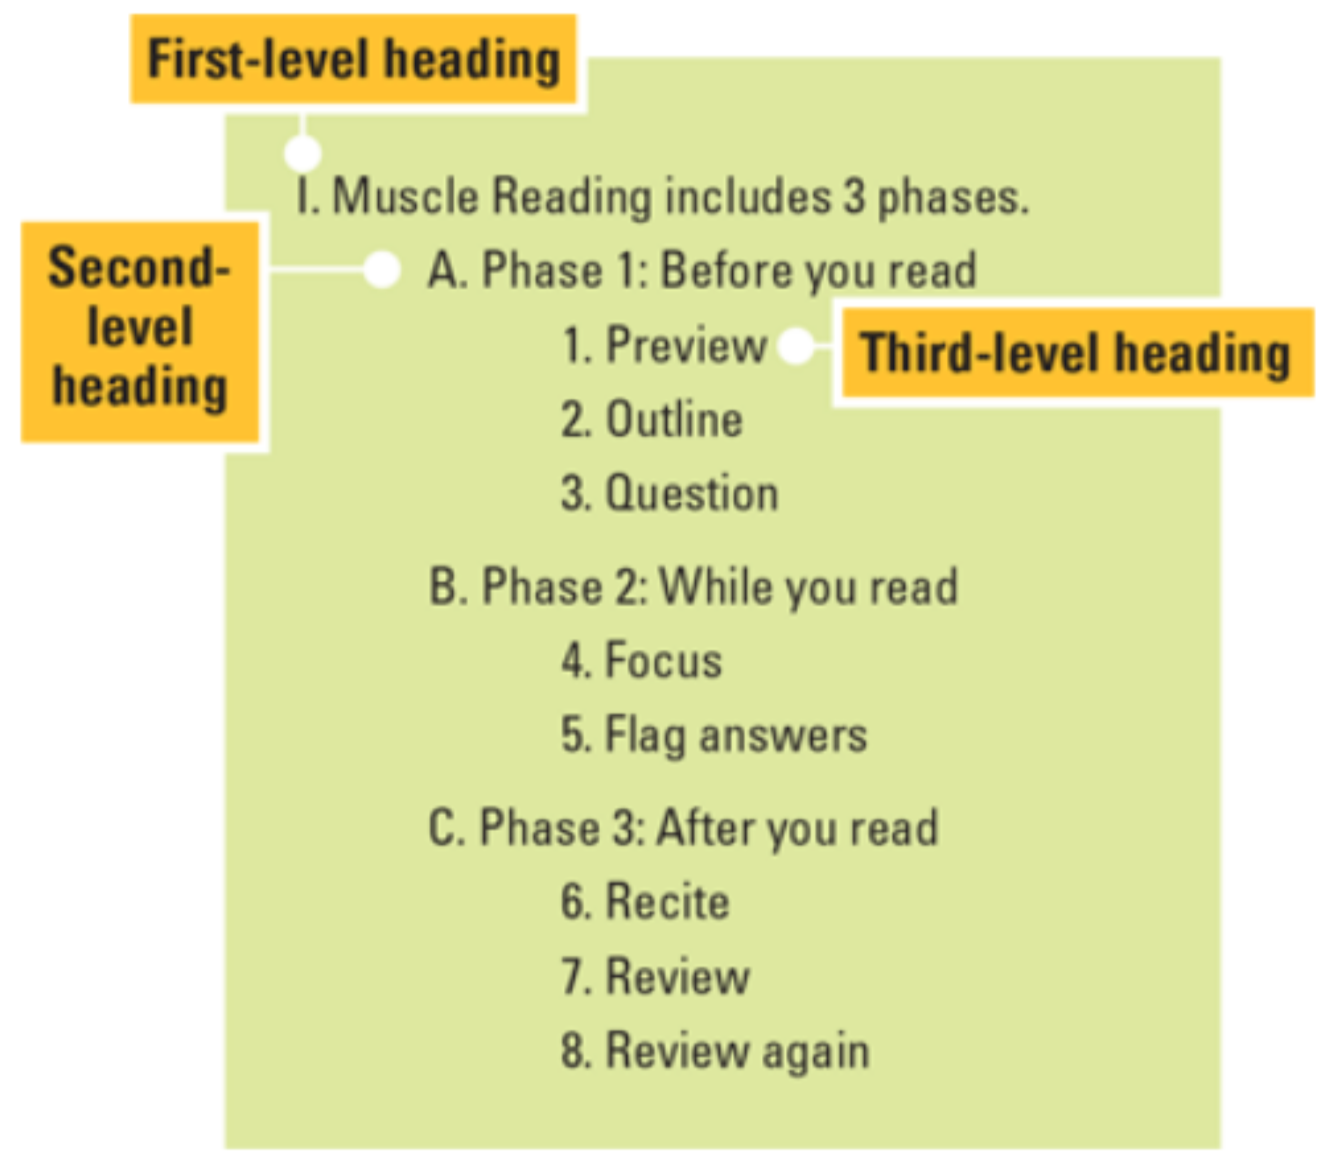
Record—Outline
A traditional outline shows the relationships among major points and supporting ideas. One benefit of taking notes in the outline format is that doing so can totally occupy your attention. You are recording ideas and also organizing them. This process can be an advantage if the material has been presented in a disorganized way. By playing with variations, you can discover the power of outlining to reveal relationships among ideas. Technically, each word, phrase, or sentence that appears in an outline is called a heading. Headings are arranged in different levels:
- In the first, or top, level of headings, note the major topics presented in a lecture or reading assignment.
- In the second level of headings, record the key points that relate to each topic in the first level of headings.
- In the third level of headings, record specific facts and details that support or explain each of your second level of headings. Each additional level of subordinate heading supports the ideas in the previous level of heading.
- Roman numerals offer one way to illustrate the difference between levels of headings.
Example Notes Using Outlining
Feel free to use different note-taking systems for different subjects and to combine formats. Do what works for you.
For example, combine mind maps along with the Cornell method. You can modify the Cornell format by dividing your paper in half. Reserve one-half for mind maps and the other half for linear information such as lists, graphs, and outlines as well as equations, long explanations, and word- for-word definitions. You can incorporate a mind map into your paragraph-style notes whenever you feel one is appropriate. Mind maps are also useful for summarizing notes taken in the Cornell format.
John Sperry, a teacher at Utah Valley State College, developed a note-taking system that can include all of the formats discussed in this lesson:
- Fill up a three-ring binder with fresh paper. Open your notebook so that you see two blank pages—one on the left and one on the right. Plan to take notes across this entire two-page spread.
- During class or while reading, write your notes only on the left-side page. Place a large dash next to each main topic or point. If your instructor skips a step or switches topics unexpectedly, just keep writing.
- Later, use the right-side page to review and elaborate on the notes that you took earlier. This page is for anything you want. For example, add visuals such as mind maps. Write review questions, headlines, possible test questions, summaries, outlines, mnemonics, or analogies that link new concepts to your current knowledge.
- To keep ideas in sequence, place appropriate numbers on top of the dashes in your notes on the left-side page. Even if concepts are presented out of order during class, they’ll still be numbered correctly in your notes.
Review—Techniques for Reviewing Your Notes
Think of reviewing as an integral part of note-taking rather than an added task. To make new information useful, encode it in a way that connects it to your long-term memory. The key is reviewing.
Review within 24 hours. The sooner you review your notes, the better, especially if the content is difficult. In fact, you can start reviewing during class. When your instructor pauses to set up the overhead display or erase the board, scan your notes. Dot the i’s, cross the t’s, and write out unclear abbreviations. Another way to use this technique is to get to your next class as quickly as you can. Then use the four or five minutes before the lecture begins to review the notes you just took in the previous class. If you do not get to your notes immediately after class, you can still benefit by reviewing them later in the day. A review right before you go to sleep can also be valuable.
Think of the day’s unreviewed notes as leaky faucets, constantly dripping and losing precious information until you shut them off with a quick review. Remember, it’s possible to forget most of the material within 24 hours—unless you review.
Edit your notes. During your first review, fix words that are illegible. Write out abbreviated words that might be unclear to you later. Make sure you can read everything. If you can’t read something or don’t understand something you can read, mark it and make a note to ask your instructor or another student about it. Check to see that your notes are labeled with the date and class and that the pages are numbered.
Fill in key words. As you review your notes, focus on extracting important concepts. Using the key word principles described earlier in this module, go through your notes and make a list of key words or phrases. These key words will speed up the review process later. Also experiment with the Cornell method for taking notes, which centers on organizing your notes on the basis of key words.
Use your key words as cues to recite. Cover your notes with a blank sheet of paper so that you can see only the key words in the left-side margin. Take each key word in order, and recite as much as you can about the point. Then, uncover your notes and look for any important points you missed.
Conduct short weekly review periods. Once a week, review all of your notes again. These review sessions don’t need to take a lot of time. Even a 20-minute weekly review period is valuable. Some students find that a weekend review—say, on Sunday afternoon—helps them stay in continuous touch with the material. Scheduling regular review sessions on your calendar helps develop the habit.
Consider typing your notes. Some students type up their handwritten notes on the computer. The argument for doing so is threefold. First, typed notes are easier to read. Second, they take up less space. Third, the process of typing them forces you to review the material.
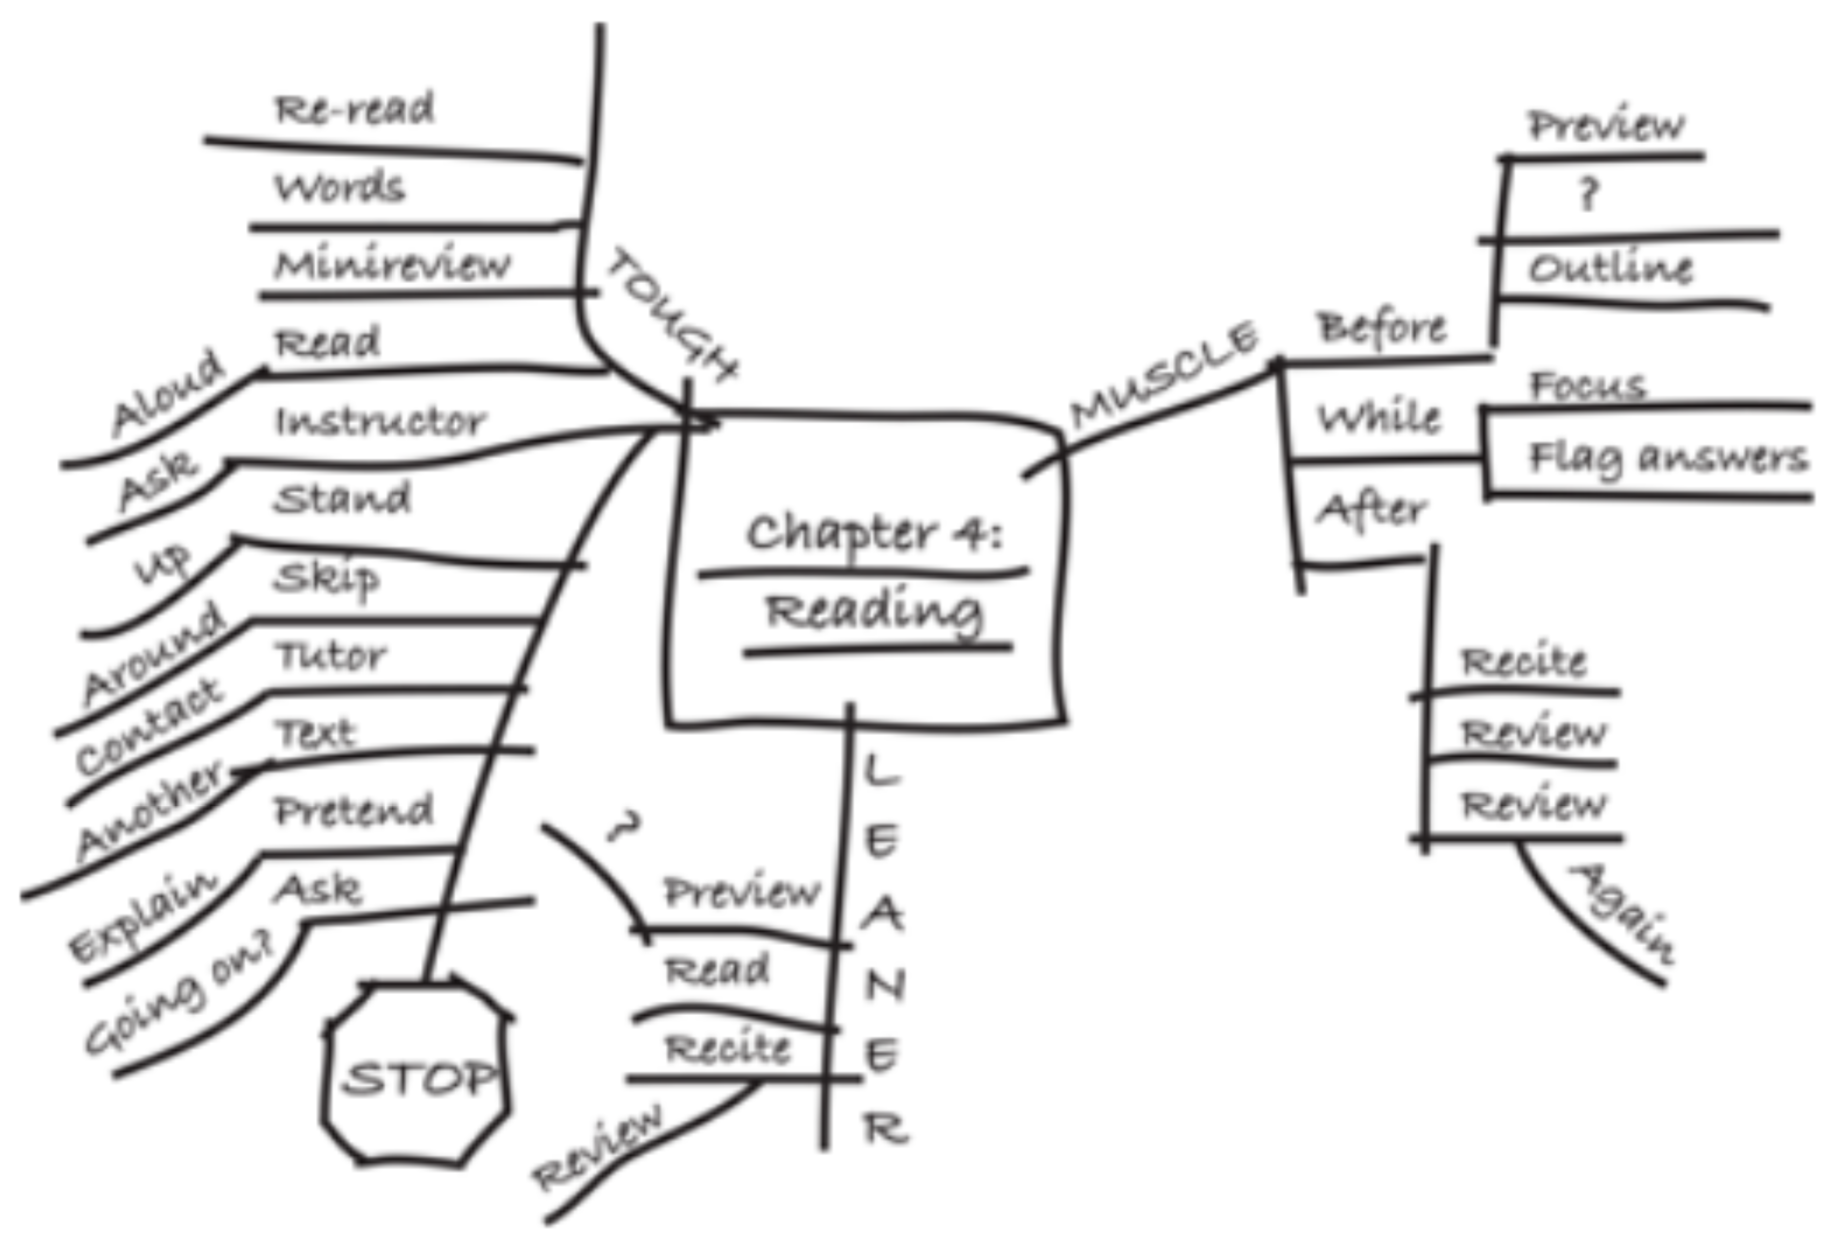
Create summaries. Mind mapping is an excellent way to summarize large sections of your course notes or reading assignments. Create one map that shows all the main topics you want to remember. Then create another map about each main topic. After drawing your maps, look at your original notes, and fill in anything you missed. This system is fun and quick.
Example Mind Map Summary
Another option is to create a cheat sheet. There’s only one guideline: Fit all your review notes on a single sheet of paper. Use any note-taking format that you want—mind map, outline, Cornell method, or a combination of all of them. The beauty of this technique is that it forces you to pick out main ideas and key details. There’s not enough room for anything else!
Some instructors might let you use a summary sheet during an exam. But even if you can’t use it, you’ll benefit from creating one while you study for the test. Summarizing is a powerful way to review.
Turning PowerPoints Into Notes
PowerPoint presentations are common. They can also be lethal for students who want to master course content or those who simply want to stay awake.
Some students stop taking notes during a PowerPoint presentation. This choice can be hazardous to your academic health for several reasons. For one thing, PowerPoint presentations don’t always include all of the key material. Depending on them can leave large gaps in your notes. When you stop taking notes, you might also stop being an active participant in class.
To create value from PowerPoint presentations, take notes on them. Continue to observe, record, and review. See PowerPoint as a way to guide rather than to replace your own note-taking. Even the slickest, smartest presentation is no substitute for your own thinking.
Experiment with the following suggestions. They include ideas about what to do before, during, and after a PowerPoint presentation.
Before the presentation. Sometimes, instructors make PowerPoint slides available before a lecture. If you have computer access, download these files. Scan the slides, just as you would preview a reading assignment.
Consider printing out the slides and bringing them along to class. (If you own a copy of PowerPoint, then choose the Handouts option when printing. This will save paper and ink.) You can take notes directly on the pages that you print out. Be sure to add the slide numbers if they are missing.
If you use a laptop computer for taking notes during class, then you might not want to bother with printing. Just open up the PowerPoint file and type your notes in the window that appears at the bottom of each slide. After class, you can print out the slides in note view. This will show the original slides plus any text that you added.
During the presentation. In many cases, PowerPoint slides are presented visually by the instructor only during class. The slides are not provided as handouts, and they are not available online for students to print out.
This makes it even more important to take effective notes in class. Capture the main points and key details as you normally would. Use your preferred note-taking strategies.
Be selective in what you write down. Determine what kind of material is on each slide. Stay alert for new topics, main points, and important details. Taking too many notes makes it hard to keep up with a speaker and separate main points from minor details.
In any case, go beyond the slides. Record valuable questions and answers that come up during a discussion, even if they are not a planned part of the presentation.
After the presentation. If you printed out slides before class and took notes on those pages, then find a way to integrate them with the rest of your notes. For example, add references in your notebook to specific slides. Or create summary notes that include the major topics and points from readings, class meetings, and PowerPoint presentations.
Printouts of slides can make review tools. Use them as cues to recite. Cover up your notes so that only the main image or words on each slide are visible. See whether you can remember what else appears on the slide, along with the key points from any notes you added.
Also consider “editing” the presentation. If you have the PowerPoint file on your computer, make another copy of it. Open up this copy, and see whether you can condense the presentation. Cut slides that don’t include anything you want to remember. Also, rearrange slides so that the order makes more sense to you. Remember that you can open up the original file later if you want to see exactly what your instructor presented.
Taking Notes When Your Instructor Talks Quickly
Instructors are different in their communication style. Sometimes, instructors talk very quickly, and it may seem difficult to take notes.
The following strategies can help you take notes when your instructor talks quickly:
Take more time to prepare for class. Familiarity with a subject increases your ability to pick up on key points. If an instructor lectures quickly or is difficult to understand, conduct a thorough preview of the material to be covered.
Be willing to make choices. Focus your attention on key points. Instead of trying to write everything down, choose what you think is important. Occasionally, you will make a less-than- perfect choice or even neglect an important point. Worse things could happen. Stay with the lecture, write down key words, and revise your notes immediately after class.
Exchange photocopies of notes with classmates. Your classmates might write down something you missed. At the same time, your notes might help them. Exchanging photocopies can fill in the gaps.
Leave large empty spaces in your notes. Leave plenty of room for filling in information you missed. Use a symbol that signals you’ve missed something so that you can remember to come back to it.
See the instructor after class. Take your class notes with you, and show the instructor what you missed.
Use an audio recorder. Recording a lecture gives you a chance to hear it again whenever you choose. Some audio-recording software allows you to vary the speed of the recording. With this feature, you can perform magic and actually slow down the instructor’s speech.
Before class, take notes on your reading assignment. You can take detailed notes on the text before class. Leave plenty of blank space. Take these notes with you to class, and simply add your lecture notes to them.
Go to the lecture again. Many classes are taught in multiple sections. That gives you the chance to hear a lecture at least twice—once in your regular class and again in another section of the class.
Learn shorthand. Some note-taking systems, known as shorthand, are specifically designed for getting ideas down fast. Books and courses are available to help you learn these systems. You can also devise your own shorthand method by inventing one- or two-letter symbols for common words and phrases.
Ask questions—even if you’re totally lost. Many instructors allow a question session. This is the time to ask about the points you missed.
At times, you might feel so lost that you can’t even formulate a question. That’s okay. One option is to report this fact to the instructor. She can often guide you to a clear question. Another option is to ask a related question. Doing so might lead you to the question you really want to ask.
Ask the instructor to slow down. This solution is the most obvious. If asking the instructor to slow down doesn’t work, ask her to repeat what you missed.
Taking Notes While Reading
Taking notes while reading requires the same skills that apply to taking class notes: observing, recording, and reviewing. Use these skills to take notes for review and for research.
Review notes will look like the notes you take in class. Take review notes when you want more detailed notes than writing in the margin of your text allows. You might want to single out a particularly difficult section of a text and make separate notes. Or make summaries of overlapping lecture and text material. Because you can’t underline or make notes in library books, these sources will require separate notes, too.
To take more effective review notes, use the following suggestions:
Set priorities. Single out a particularly difficult section of a text and make separate notes. Or make summaries of overlapping lecture and text material.
Use a variety of formats. Translate text into Cornell notes, mind maps, or outlines. Combine these formats to create your own. Translate diagrams, charts, and other visual elements into words. Then, reverse the process by translating straight text into visual elements.
However, don’t let the creation of formats get in your way. Even a simple list of key points and examples can become a powerful review tool. Another option is to close your book and just start writing. Write quickly about what you intend to remember from the text, and don’t worry about following any format.
Condense a passage to key quotes. Authors embed their essential ideas in key sentences. As you read, continually ask yourself, What’s the point? See whether you can point to a specific sentence on the page to answer your question. Look especially at headings, subheadings, and topic sentences of paragraphs. Write these key sentences word for word in your notes, and put them within quotation marks. Copy as few sentences as you can and still retain the core meaning of the passage.
Condense by paraphrasing. Pretend that you have to summarize a chapter, article, or book on a postcard. Limit yourself to a single paragraph—or a single sentence—and use your own words. This is a great way to test your understanding of the material.
Take a cue from the table of contents. Look at the table of contents in your book. Write each major heading on a piece of paper, or key those headings into a file on your computer. Include page numbers. Next, see whether you can improve on the table of contents. Substitute your own headings for those that appear in the book. Turn single words or phrases into complete sentences, and use words that are meaningful to you.
Adapt to special cases. The style of your notes can vary according to the nature of the reading material. If you are assigned a short story or poem, for example, then read the entire work once without taking any notes. On your first reading, simply enjoy the piece. When you finish, write down your immediate impressions. Then, go over the piece again. Make brief notes on characters, images, symbols, settings, plot, point of view, or other aspects of the work.
Note key concepts in math and science. When you read mathematical, scientific, or other technical materials, copy important formulas or equations. Recreate important diagrams, and draw your own visual representations of concepts. Also write down data that might appear on an exam.
Taking Research Notes
Take research notes when preparing to write a paper or deliver a speech. One traditional method of research is to take notes on 3 × 5 cards. You write one idea, fact, or quotation per card, along with a note about the source (where you found it). The advantage of limiting each card to one item is that you can easily arrange cards according to the sequence of ideas in your outline.
Taking notes on a computer offers the same flexibility as index cards. Just include one idea, fact, or quotation per paragraph along with the source. Think of each paragraph as a separate card. When you’re ready to create the first draft of your paper or presentation, just move paragraphs around so that they fit your outline.
Include your sources. Whether you use cards or a computer, be sure to include a source for each note that you take.
Say, for example, that you find a useful quotation from a book. You want to include that quotation in your paper. Copy the quotation word for word onto a card, or key the quotation into a computer file. Along with the quotation, note the book’s author, title, date and place of publication, and publisher. You’ll need such information later when you create a formal list of your sources—a bibliography, or a list of endnotes or footnotes.
Whenever possible, print out or make photocopies of each source. For books, include a copy of the title page and copyright page, both of which are found in the front matter. For magazines and scholarly journals, copy the table of contents.
For each book you consult, record the following:
- Author
- Editor (if listed)
- Translator (if listed)
- Edition number (if listed)
- Full title, including the subtitle
- Name and location of the publisher
- Copyright date
- Page numbers for passages that you quote, summarize, or paraphrase
For each article you consult, record the following:
- Author
- Editor (if listed)
- Translator (if listed)
- Full title, including the subtitle
- Name of the periodical
- Volume number
- Issue number
- Issue date
- Page numbers for passages that you quote, summarize, or paraphrase
For other types of sources, ask your instructor for guidelines about what information to record.
Avoid plagiarism. When people take material from a source and fail to acknowledge that source, they are committing plagiarism. Even when plagiarism is accidental, the consequences can be harsh.
Many cases of plagiarism occur during the process of taking research notes. To prevent this problem, remember that a major goal of taking research notes is to clearly separate your own words and images from words and images created by someone else. To meet this goal, develop the following habits:
- If you take a direct quote from one of your sources, enclose those words in quotation marks and note the information about that source.
- If you take an image (photo, illustration, chart, or diagram) from one of your sources, note the information about that source.
- If you summarize or paraphrase a specific passage from one of your sources, use your own words and note the information about that source.
- If your notes include any idea that is closely identified with a particular person, note the information about the source.
- If you include one of your own ideas in your notes, simply note the source as “me.”
- If you’re taking notes on a computer and using Internet sources, be especially careful to avoid plagiarism. When you copy text or images from a website, separate those notes from your own ideas. Use a different font for copied material, or enclose it in quotation marks.
You do not need to note a source for these:
- Facts that are considered common knowledge (The history of the twentieth century includes two world wars.)
- Facts that can be easily verified (The US Constitution includes a group of amendments known as the Bill of Rights.)
- Your own opinion (Hip-hop artists are the most important poets of our age.)
The bottom line: Always present your own work—not materials that have been created or revised by someone else. If you’re ever in doubt about what to do, then take the safest course: Cite the source. Give credit where credit is due.
Taking Notes in Online Courses
You may not always take classes in a formal classroom setting. Many classes are now offered online. The following suggestions will help with taking notes and keeping track of information in online courses.
Do a trial run with technology. Verify your access to course web sites, including online tutorials, PowerPoint presentations, readings, quizzes, tests, assignments, bulletin boards, and chatrooms. Ask your instructors for the website addresses (URLs), e-mail addresses, and passwords. Work out any bugs when you start the course and well before that first assignment is due.
Develop a contingency plan. Murphy’s Law of computer crashes states that technology tends to break down at the moment of greatest inconvenience. You might not believe this piece of folklore, but it’s still wise to prepare for it:
- Find a “technology buddy” in each of your classes—someone who can contact the instructor if you lose Internet access or experience other computer problems.
- Every day, back up the files created for your courses.
- Keep extra printer supplies—paper, toner, and ink—on hand at all times. Don’t run out of necessary supplies on the day a paper is due.
Take notes on course material. You can print out anything that appears on a computer screen. This includes online course materials—articles, books, manuscripts, e-mail messages, chatroom sessions, and more.
The potential problem is that you might skip the note-taking process altogether. (I can just print out everything!) You would then miss the chance to internalize a new idea by restating it in your own words—a principal benefit of note-taking. Result: Material passes from computer to printer without ever intersecting with your brain. To prevent this problem, take notes on your online course material.
Ask for help. If you feel confused about anything you’re learning online, ask for help right away. This is especially important when you don’t see the instructor face-to-face in class. Some students simply drop online courses rather than seek help. E-mail or call the instructor before you make that choice. If the instructor is on campus, you might be able to arrange for a meeting during office hours.
Manage time and tasks carefully. Courses that take place mostly or totally online can become invisible in your weekly academic schedule. This reinforces the temptation to put off dealing with these courses until late in the term.
Avoid this mistake! Consider the real possibility that an online course can take more time than a traditional, face-to-face lecture class.
One key to keeping up with the course is frequent contact and careful time management:
- Early in the term, create a detailed schedule for online courses. In your calendar, list a due date for each assignment. Break big assignments into smaller steps, and schedule a due date for each step.
- Schedule times in your calendar to complete online course work. Give these scheduled sessions the same priority as regular classroom meetings. At these times, check for online announcements relating to assignments, tests, and other course events. Check for course-related e-mails daily.
- If the class includes discussion forums, check those daily as well. Look for new posts and add your replies. The point of these tools is to create a lively conversation that starts early and continues throughout the term.
- When you receive an online assignment, e-mail any questions immediately. If you want to meet with an instructor in person, request an appointment several days in advance.
- Give online instructors plenty of time to respond. They are not always online. Many online instructors have traditional courses to teach, along with administration and research duties.
- Download or print out online course materials as soon as they’re posted on the class website. These materials might not be available later in the term.
Focus your attention. Some students are used to visiting websites while watching TV, listening to music, or browsing their social media feed. When applied to online learning, these habits can reduce your learning and imperil your grades. To succeed with online learning technology, turn off the distractions. Whenever you go online, stay in charge of your attention.
References
Brazeau, Gayle A. “Handouts in the classroom: Is note taking a lost skill?” American Journal of Pharmaceutical Education 70, 2 (2006): 38.
Buzan, Tony. Use Both Sides of Your Brain. New York: Dutton, 1991.
Pauk, Walter and Ross J. Q. Owens. How to Study in College, 10th ed. Boston: Cengage Learning, 2011.
Rico, Gabrielle. Writing the Natural Way. New York: Penguin, 2000.