
2.5: Using Word Styles
- Page ID
- 51889

Everyone loves style! Industrial designers use it to attract people to their products. Graphic designers use it to organize information on a page and designate changes in topic. We’ll create organization of our content, add meaning, and make it easier to navigate by adding Word Styles. Word Styles are used to format headings, emphasized and strongly emphasized text, links, paragraphs, and lists for example. When text is formatted with Styles in Word, it creates a navigational structure that screen reader users can use to quickly get to the information they want.
Screen reader users use shortcut combinations of keys, for example, to bring up a list of headings that can help them navigate to where they want to go in the document faster. In JAWS, pressing the Insert key followed by F6 will bring up a list of headings. The numbers behind the names of the headings, such as 1, 2, and 3 designate heading level. It is good practice to create one heading level 1 at the top of the page that describes what the page is about, followed by subheading levels 2 through 6. In JAWS, pressing of the H key will help a screen reader user jump from heading to heading on a page. See a screen shot of what JAWS’ Heading List floating window looks like on top of a Word syllabus with headings levels 1 and 2. Within this document, you can see that the heading level 1 is the title of the document, “Syllabus for NUR 440.” The syllabus is then broken up into sections, which are second level headings.
Once you add headings with Word Styles, you can see them in Word’s NavigationPane to the left of the document. If you don’t see the navigation pane, you can bring it up by going under the View menu in Word and checking the box next to Navigation Pane. It shows you the structure of your page and can help people without disabilities also. See the screen shot of the Navigation Pane and the box to enable this outlined in red with a red arrow pointing to it (for accessibility reason).
How to Apply a Word Heading Style
In html, there are 6 heading levels represented by H1 through H6. H1 is typically your largest and/or most important heading of a document. H2 headings would be subheadings of the H1 heading. H3 headings would be subheadings of H2, H4 headings would be subheadings of H3, and so forth, creating a visual and semantic hierarchy. The following graphic is a way to visualize the hierarchy.
The heading level 1 at the top of this page will be the name of the syllabus for a class, such as “Syllabus for Nursing 440.” It sums up what the page is about. Once you type this in, highlight the text and click the Heading 1 style in Word’s Styles bar at the top. You can expand the styles into a pane that floats to the right, by pressing the tiny button, with the diagonal arrow that points toward the lower right, at the bottom right of the styles menu. In the graphic below, the red arrow points to the button to open the Styles pane.
The Styles pane is bordered by the red box in the image below, pointed to by a large red arrow.
A Note about the Title and Subtitle Styles:
If you use the Title or Subtitle style to designate Title text within a Word document, this will not show up in a list of headings, within a screen reader. It will also not convert to a <title> element if the document is saved as a Web Page Filtered. Title and Subtitle text gets converted to an ordinary paragraph element in HTML. If you use a Heading level 1 to style your title or main subject, this will show up in a list of headings to help the user navigate the page.
A note about Heading levels above 6:
Headings 1 through 6 should convert to their corresponding HTML heading element (<h1>, <h2>, <h3>, <h4>, <h5>, and <h6>), but heading levels greater than this, such as Heading 7 through Heading 9, will convert to paragraphs with custom classes to affect their visual appearance, when a Word document is saved as a Web Page Filtered. This isn’t semantically correct.
A note about text formatted as lists in Word:
I’m seeing each list item convert to a paragraph element in HTML instead of their semantically correct <li> (list item).
How to Modify a Heading Style
A movie tutorial on how to modify a Heading 1 Style in Word exists at http://flash.ulib.csuohio.edu/elearn...1_in_Word.html, or you can view the written instructions below.
An interactive or media element has been excluded from this version of the text. You can view it online here: https://pressbooks.ulib.csuohio.edu/accessibility/?p=102
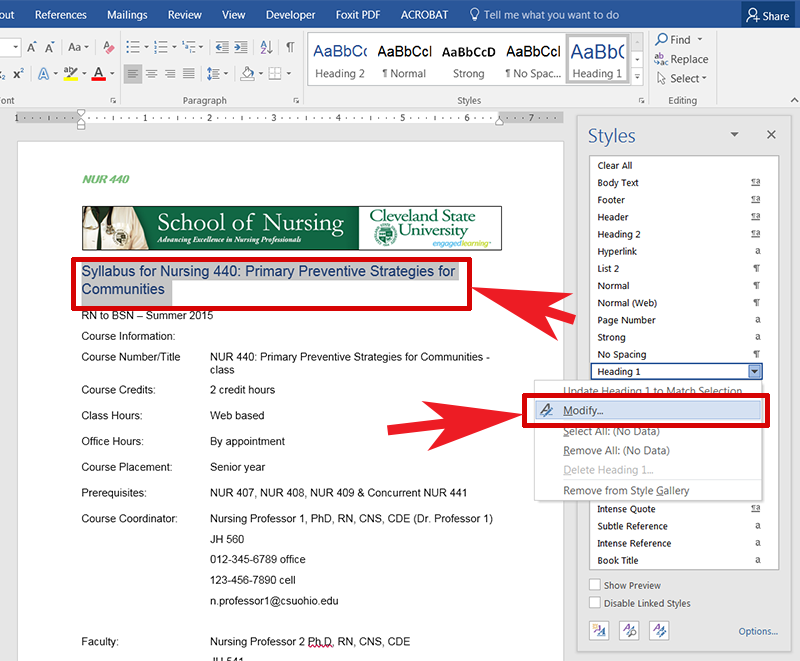
If you don’t like a style, you can change it by right clicking on the name of the style in the Styles pane, and selecting “Modify.” In the image below, the text that has the heading level 1 applied to it is selected at the top of the screen. It is, “Syllabus for Nursing 440: Primary Preventive Strategies for Communities,” outlined in a red box, pointed out by a large red arrow. The Modify option is outlined in a thick red box also, pointed out by a large red arrow.
Within the Modify Style dialogue box, you’ll see options to change the font, font size, font color, font weight, emphasis, bolding, underlining, line spacing, space before and after a line of text, indentation and alignment at the top. There are more options available, like setting the language, by clicking the Format button in the lower left of the Modify Style window. These options are outlined in thick red boxes in the image below, and pointed to by the large red arrows.

Control of the space between lines and before and after styled text, without hitting the Return or Enter key, is important. If you format with extra line returns or by hitting the space key multiple times, this adds extra hidden characters to your layout. If a Word document is later converted to a PDF, these extra returns create extra meaningless tags that have to be deleted from a tagged PDF. You can see extra returns and spaces within documents by clicking on the icon that looks like a paragraph symbol under the Home ribbon. It looks like a backwards P and is the Show/Hide button for showing paragraph returns, spaces, tabs and other hidden characters.
You can add space above and below your selected text equally by using the fourth and fifth buttons on the second row of the formatting area in the Modify Style dialogue box. The button that increases spacing between a heading and the surrounding content has two blue arrows, pointing away from one another. The button that decreases space between a heading and surrounding content has two blue arrows pointing at one another. You can also adjust the spacing before and after the style of text by clicking on the Format button at the bottom left of the Modify Style dialogue and selecting Paragraph.
Once in the Paragraph style dialogue menu, you can see separate text boxes to enter the space before and space after. These are outlined by the red box in the image below. A big red arrow points to this box. You also see the ability to indent, align, and adjust line spacing.
