
2.1: Creating Accessible Word Documents - Setting Language and Title
- Page ID
- 51885

Setting Document Language/s
It’s important to indicate the language or languages within your document for a screen reader to read it properly. During setup of Microsoft Office, you likely specified your default language as English. If you would need to change the default document language or add additional languages, within a multi-language document, you can do this under the File menu.
-
- Click the File menu.
- Select Options from the list on the left navigation. It’s at the bottom of this list within Word 2016.
- In the Word Options dialogue box that pops up, select Language from the navigation list on the left.
- From the drop down menu below your Editing Languages box, where it says, “Add additional editing languages,” click on the drop down arrow to expand the menu and select English (United States) or another language.
- Then, click the Add button the the right of the drop down menu. If you need to add more languages, select them from the box also, and click on the Add button.
- Click OK at the bottom of the dialogue when you are finished.
Checking with a Screen Reader
The default settings in JAWS 17 automatically detects when the language changes within a Word document and will start reading in the new language. NVDA will do this when its voice synthesizer is set to its default eSpeak NG. To make sure NVDA’s synthesizer is set to eSpeak NG, find the NVDA icon in the system tray (Windows). It looks like an N with a curved ascending arm as seen below.
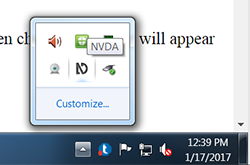
- Right click on the NVDA icon
- Select Preferences to expand its preferences menu
- Within the preferences menu, select Synthesizer
- Select the first option for synthesizer to set it to eSpeak NG. The Microsoft Speech API version 5 sounds more pleasant, but won’t automatically switch the languages its reading when the language changes.
I’ll attach a multi-language Word document below in case you would like to practice with it.
Setting Language on Small Amounts of Text in Multi-Language Document
If you find that a screen reader automatically switches to a foreign language when it should not have, or if you have small amounts of text that are a different language from the main language of the document, you can set the language on this text specifically by:
- select the line of text that it isn’t reading properly, or the word/s that are in a different language
- click the Review tab,
- click on Language in the ribbon at the top
- Select “Set Proofing Language.”
- From the Language dialogue box the opens up, you’ll see the incorrect language highlighted. Scroll to find the language you want, such as Chinese (PRC), select it and click OK at the bottom. The screen reader should now read back the line in that language. This case really did happen with the practice syllabus you’ll work on for your assignment in this chapter. For some reason, when JAWS and NVDA reached the line starting with “Prerequisites,” it started reading in German. That could throw your audience off track!
Setting a Word Document Title
Setting a Word document title can be useful if the document will be converted to HTML and viewed by a screen reader user in a browser. In the .htm (HTML) format, the title will show within the title element, located between the opening and closing head element. The structure would look like <HEAD><TITLE>Your unique title here</TITLE></HEAD> with some other elements listed between the head elements also. A title set in Word will go with a Word document converted to PDF also. You can set a title on a Word document by:
- With the document open, click on the File menu
- Select Info if it is not selected
- Under the Properties column on the right, find Title and click the Add a Title text to the right of it
- Type a unique, concise title that explains what the document is about
- Save the document
Create a Unique Concise File Name
Both in Word and Acrobat, a screen reader reads the file name first of the document that is open. Because of this, it’s a good idea to make your file name a unique, concise description of what the file is about also. It’s okay if it matches your title or heading level 1.