
7.03: Chapter 34: Speech Structure
- Page ID
- 134501
\( \newcommand{\vecs}[1]{\overset { \scriptstyle \rightharpoonup} {\mathbf{#1}} } \)
\( \newcommand{\vecd}[1]{\overset{-\!-\!\rightharpoonup}{\vphantom{a}\smash {#1}}} \)
\( \newcommand{\dsum}{\displaystyle\sum\limits} \)
\( \newcommand{\dint}{\displaystyle\int\limits} \)
\( \newcommand{\dlim}{\displaystyle\lim\limits} \)
\( \newcommand{\id}{\mathrm{id}}\) \( \newcommand{\Span}{\mathrm{span}}\)
( \newcommand{\kernel}{\mathrm{null}\,}\) \( \newcommand{\range}{\mathrm{range}\,}\)
\( \newcommand{\RealPart}{\mathrm{Re}}\) \( \newcommand{\ImaginaryPart}{\mathrm{Im}}\)
\( \newcommand{\Argument}{\mathrm{Arg}}\) \( \newcommand{\norm}[1]{\| #1 \|}\)
\( \newcommand{\inner}[2]{\langle #1, #2 \rangle}\)
\( \newcommand{\Span}{\mathrm{span}}\)
\( \newcommand{\id}{\mathrm{id}}\)
\( \newcommand{\Span}{\mathrm{span}}\)
\( \newcommand{\kernel}{\mathrm{null}\,}\)
\( \newcommand{\range}{\mathrm{range}\,}\)
\( \newcommand{\RealPart}{\mathrm{Re}}\)
\( \newcommand{\ImaginaryPart}{\mathrm{Im}}\)
\( \newcommand{\Argument}{\mathrm{Arg}}\)
\( \newcommand{\norm}[1]{\| #1 \|}\)
\( \newcommand{\inner}[2]{\langle #1, #2 \rangle}\)
\( \newcommand{\Span}{\mathrm{span}}\) \( \newcommand{\AA}{\unicode[.8,0]{x212B}}\)
\( \newcommand{\vectorA}[1]{\vec{#1}} % arrow\)
\( \newcommand{\vectorAt}[1]{\vec{\text{#1}}} % arrow\)
\( \newcommand{\vectorB}[1]{\overset { \scriptstyle \rightharpoonup} {\mathbf{#1}} } \)
\( \newcommand{\vectorC}[1]{\textbf{#1}} \)
\( \newcommand{\vectorD}[1]{\overrightarrow{#1}} \)
\( \newcommand{\vectorDt}[1]{\overrightarrow{\text{#1}}} \)
\( \newcommand{\vectE}[1]{\overset{-\!-\!\rightharpoonup}{\vphantom{a}\smash{\mathbf {#1}}}} \)
\( \newcommand{\vecs}[1]{\overset { \scriptstyle \rightharpoonup} {\mathbf{#1}} } \)
\(\newcommand{\longvect}{\overrightarrow}\)
\( \newcommand{\vecd}[1]{\overset{-\!-\!\rightharpoonup}{\vphantom{a}\smash {#1}}} \)
\(\newcommand{\avec}{\mathbf a}\) \(\newcommand{\bvec}{\mathbf b}\) \(\newcommand{\cvec}{\mathbf c}\) \(\newcommand{\dvec}{\mathbf d}\) \(\newcommand{\dtil}{\widetilde{\mathbf d}}\) \(\newcommand{\evec}{\mathbf e}\) \(\newcommand{\fvec}{\mathbf f}\) \(\newcommand{\nvec}{\mathbf n}\) \(\newcommand{\pvec}{\mathbf p}\) \(\newcommand{\qvec}{\mathbf q}\) \(\newcommand{\svec}{\mathbf s}\) \(\newcommand{\tvec}{\mathbf t}\) \(\newcommand{\uvec}{\mathbf u}\) \(\newcommand{\vvec}{\mathbf v}\) \(\newcommand{\wvec}{\mathbf w}\) \(\newcommand{\xvec}{\mathbf x}\) \(\newcommand{\yvec}{\mathbf y}\) \(\newcommand{\zvec}{\mathbf z}\) \(\newcommand{\rvec}{\mathbf r}\) \(\newcommand{\mvec}{\mathbf m}\) \(\newcommand{\zerovec}{\mathbf 0}\) \(\newcommand{\onevec}{\mathbf 1}\) \(\newcommand{\real}{\mathbb R}\) \(\newcommand{\twovec}[2]{\left[\begin{array}{r}#1 \\ #2 \end{array}\right]}\) \(\newcommand{\ctwovec}[2]{\left[\begin{array}{c}#1 \\ #2 \end{array}\right]}\) \(\newcommand{\threevec}[3]{\left[\begin{array}{r}#1 \\ #2 \\ #3 \end{array}\right]}\) \(\newcommand{\cthreevec}[3]{\left[\begin{array}{c}#1 \\ #2 \\ #3 \end{array}\right]}\) \(\newcommand{\fourvec}[4]{\left[\begin{array}{r}#1 \\ #2 \\ #3 \\ #4 \end{array}\right]}\) \(\newcommand{\cfourvec}[4]{\left[\begin{array}{c}#1 \\ #2 \\ #3 \\ #4 \end{array}\right]}\) \(\newcommand{\fivevec}[5]{\left[\begin{array}{r}#1 \\ #2 \\ #3 \\ #4 \\ #5 \\ \end{array}\right]}\) \(\newcommand{\cfivevec}[5]{\left[\begin{array}{c}#1 \\ #2 \\ #3 \\ #4 \\ #5 \\ \end{array}\right]}\) \(\newcommand{\mattwo}[4]{\left[\begin{array}{rr}#1 \amp #2 \\ #3 \amp #4 \\ \end{array}\right]}\) \(\newcommand{\laspan}[1]{\text{Span}\{#1\}}\) \(\newcommand{\bcal}{\cal B}\) \(\newcommand{\ccal}{\cal C}\) \(\newcommand{\scal}{\cal S}\) \(\newcommand{\wcal}{\cal W}\) \(\newcommand{\ecal}{\cal E}\) \(\newcommand{\coords}[2]{\left\{#1\right\}_{#2}}\) \(\newcommand{\gray}[1]{\color{gray}{#1}}\) \(\newcommand{\lgray}[1]{\color{lightgray}{#1}}\) \(\newcommand{\rank}{\operatorname{rank}}\) \(\newcommand{\row}{\text{Row}}\) \(\newcommand{\col}{\text{Col}}\) \(\renewcommand{\row}{\text{Row}}\) \(\newcommand{\nul}{\text{Nul}}\) \(\newcommand{\var}{\text{Var}}\) \(\newcommand{\corr}{\text{corr}}\) \(\newcommand{\len}[1]{\left|#1\right|}\) \(\newcommand{\bbar}{\overline{\bvec}}\) \(\newcommand{\bhat}{\widehat{\bvec}}\) \(\newcommand{\bperp}{\bvec^\perp}\) \(\newcommand{\xhat}{\widehat{\xvec}}\) \(\newcommand{\vhat}{\widehat{\vvec}}\) \(\newcommand{\uhat}{\widehat{\uvec}}\) \(\newcommand{\what}{\widehat{\wvec}}\) \(\newcommand{\Sighat}{\widehat{\Sigma}}\) \(\newcommand{\lt}{<}\) \(\newcommand{\gt}{>}\) \(\newcommand{\amp}{&}\) \(\definecolor{fillinmathshade}{gray}{0.9}\)35
Chapter 34: Speech Structure
Rebekah Bennetch, Corey Owen, and Zachary Keesey
Learning Objectives
By the end of this chapter, you should be able to:
- Create a preparation outline and speaking outline for your extemporaneous speech
- Use keywords from your outline to develop a 3×5 cue card
Key Terms and Concepts
- outline
- preparation outline
- speaking outline
- connective statements
As you saw in the last chapter, we want you to use an extemporaneous style for your speech delivery. Many of you may feel a bit uncomfortable with this idea if you are used to using a manuscript or memorized style. However, we want to stress that you are not going to go into your presentation unprepared. This chapter will show you how to outline your speech and give you several different elements you can use while designing it.
Outlining Your Speech
An outline provides a visual structure where you can compile information into a well-organized document. The amount of information you include will depend on your needs. For our course, we want you to use a preparation outline, which is a comprehensive form of outline that includes all of the information in your speech. If someone were to read your preparation outline, there should be enough depth to provide an idea of what will be accomplished.
Generally, we recommend starting from this outline format:
Sample Speech Outline |
I. Introduction a. Attention Getter / Hook |
II. Main body
|
You should think of the outline as the blueprint for your speech. It is not the speech—that is what comes out of your mouth in front of the audience. The outline helps you prepare and, as such, they are a living document that you can adjust, add, and delete. We recommend beginning to add information right away. However, keep in mind that you will not have the whole document with you during your speech. Instead, you’ll use a speakingoutline that you write on your 3×5 index card.
A speaking outline is a keyword outline used to deliver an extemporaneous speech. The notes you use to speak can aid or hinder in an effective delivery. A keyword outline on your 3×5 card—which you’ll use to rehearse and deliver—will allow greater embodiment and engagement with the audience. As you practice, you will be able to summarize the full preparation outline down to more usable notes. In those notes, create a set of abbreviated notes for the actual delivery. The more materials you take up with you to speak, the more you will be tempted to look at them rather than have eye contact with the audience, reducing your overall engagement.
Your speaking notes should be in far fewer words than the preparation, arranged in key phrases, and readable for you. Your speaking outline should provide cues to yourself to “slow down,” “pause,” or “change slide.” Our biggest suggestion is to make the notes workable for you. More information on structuring your cue card is included in the next section.
Using Cue Cards
An extemporaneous speech is a presentation that is carefully planned and practiced ahead of time. A tool that can help you in your speech is to use a 3.5×5 card effectively. Your card is meant to help prompt you as you give your speech, and to keep you on track. It is NOT meant to be a transcript where you write out your speech.
Exercise: Evaluate Cue Cards
Below are images of three cue cards. Look at Image #1. Do you think this person’s speech was successful according to the constraints of an extemporaneous speech? Why or why not?

Obviously, Image #1 is an example of what not to do when using a cue card. Keep in mind that your card is a tool for you to consult while you speak. You do not need to write everything on it that you would like to say.
Now let’s look at two more cue cards (Images #2 and #3). What is it that makes these two cards better? How are they different from Image #1?

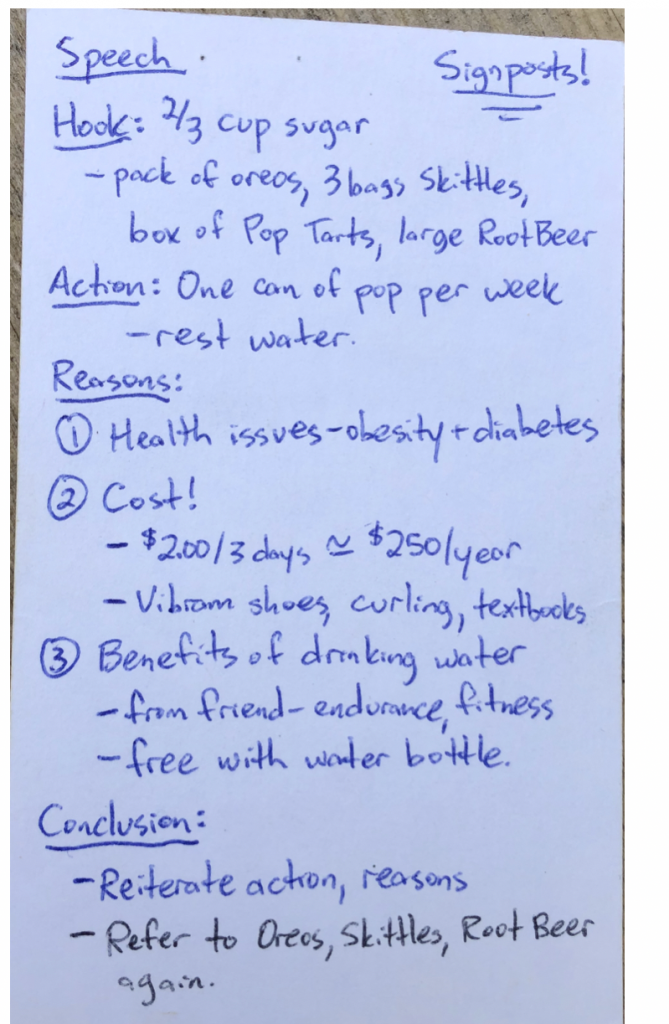
Your card is meant to be recognized by you (the speaker), and you alone—so you can use abbreviations (similar to the ‘SHR’ used in Image #2 above) or have shorthand notes that will help to jog your memory. Recognize that you probably will NOT need to write as much on your cue card as you may think you need to.
As you practice, make sure to practice using the same card.
Setting Up Your Speech
Introductions and conclusions serve to frame the speech and give it a clearly defined beginning and end. They help the audience see what is to come in the speech, and then let them mentally prepare for the end. In doing this, introductions and conclusions provide a “preview/review” of your speech as a means to reiterate to your audience what you are talking about. Because speeches are auditory and live, you need to make sure that audiences remember what you are saying.
The general rule is that the introduction and conclusion should each be about 10% of your total speech, leaving 80% for the body section. It can be tempting to have longer introductions, but that often leaves less time to introduce key research and warrant your ideas through the main points. Since your speech for this course is five minutes long, that means your introduction and conclusion should each be about 30 seconds.
Structuring the Introduction
Many speakers struggle with how to start their speech because they’re often worried that their words won’t be memorable, attention-capturing, and clever enough to get their audience interested. This is a problem for many of us because the first words you say, in many ways, set the tone for the rest of your speech. There may not be any one “best” way to start a speech, but we can provide some helpful guidelines that will make starting a speech much easier.Common Errors to Avoid in Introductions | ||||||||||||||||||||
| ||||||||||||||||||||