

7: Introduction to Publishing
- Page ID
- 406041
\( \newcommand{\vecs}[1]{\overset { \scriptstyle \rightharpoonup} {\mathbf{#1}} } \)
\( \newcommand{\vecd}[1]{\overset{-\!-\!\rightharpoonup}{\vphantom{a}\smash {#1}}} \)
\( \newcommand{\dsum}{\displaystyle\sum\limits} \)
\( \newcommand{\dint}{\displaystyle\int\limits} \)
\( \newcommand{\dlim}{\displaystyle\lim\limits} \)
\( \newcommand{\id}{\mathrm{id}}\) \( \newcommand{\Span}{\mathrm{span}}\)
( \newcommand{\kernel}{\mathrm{null}\,}\) \( \newcommand{\range}{\mathrm{range}\,}\)
\( \newcommand{\RealPart}{\mathrm{Re}}\) \( \newcommand{\ImaginaryPart}{\mathrm{Im}}\)
\( \newcommand{\Argument}{\mathrm{Arg}}\) \( \newcommand{\norm}[1]{\| #1 \|}\)
\( \newcommand{\inner}[2]{\langle #1, #2 \rangle}\)
\( \newcommand{\Span}{\mathrm{span}}\)
\( \newcommand{\id}{\mathrm{id}}\)
\( \newcommand{\Span}{\mathrm{span}}\)
\( \newcommand{\kernel}{\mathrm{null}\,}\)
\( \newcommand{\range}{\mathrm{range}\,}\)
\( \newcommand{\RealPart}{\mathrm{Re}}\)
\( \newcommand{\ImaginaryPart}{\mathrm{Im}}\)
\( \newcommand{\Argument}{\mathrm{Arg}}\)
\( \newcommand{\norm}[1]{\| #1 \|}\)
\( \newcommand{\inner}[2]{\langle #1, #2 \rangle}\)
\( \newcommand{\Span}{\mathrm{span}}\) \( \newcommand{\AA}{\unicode[.8,0]{x212B}}\)
\( \newcommand{\vectorA}[1]{\vec{#1}} % arrow\)
\( \newcommand{\vectorAt}[1]{\vec{\text{#1}}} % arrow\)
\( \newcommand{\vectorB}[1]{\overset { \scriptstyle \rightharpoonup} {\mathbf{#1}} } \)
\( \newcommand{\vectorC}[1]{\textbf{#1}} \)
\( \newcommand{\vectorD}[1]{\overrightarrow{#1}} \)
\( \newcommand{\vectorDt}[1]{\overrightarrow{\text{#1}}} \)
\( \newcommand{\vectE}[1]{\overset{-\!-\!\rightharpoonup}{\vphantom{a}\smash{\mathbf {#1}}}} \)
\( \newcommand{\vecs}[1]{\overset { \scriptstyle \rightharpoonup} {\mathbf{#1}} } \)
\(\newcommand{\longvect}{\overrightarrow}\)
\( \newcommand{\vecd}[1]{\overset{-\!-\!\rightharpoonup}{\vphantom{a}\smash {#1}}} \)
\(\newcommand{\ket}[1]{\left| #1 \right>}\)
\(\newcommand{\bra}[1]{\left< #1 \right|}\)
\(\newcommand{\braket}[2]{\left< #1 \vphantom{#2} \right| \left. #2 \vphantom{#1} \right>}\)
\(\newcommand{\braopket}[3]{\left< #1 \vphantom{#2}\vphantom{#3} \right| #2 \vphantom{#1}\vphantom{#3} \left| #3 \vphantom{#1}\vphantom{#2} \right>}\)
\(\newcommand{\qmvec}[1]{\mathbf{\vec{#1}}}\)
\(\newcommand{\op}[1]{\hat{\mathbf{#1}}}\)
\(\newcommand{\expect}[1]{\langle #1 \rangle}\)
\(\newcommand{\dfn}[1]{\emph{\textbf{#1}}}\)
↵
Publishing Considerations
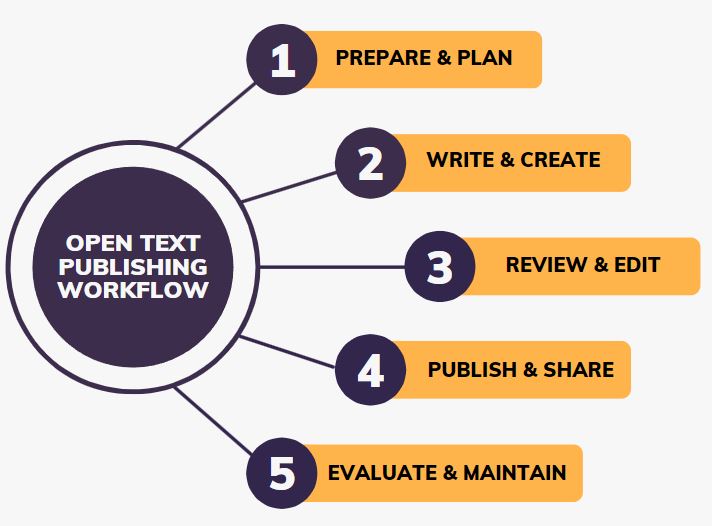
Image credit: Open Publishing Guide for Authors
1. Prepare & Plan
At this stage, ask yourself a few key questions to gauge your OER knowledge and skills before starting an open text. Have you explored OER content in your subject area? Do you need training on working with openly licensed content? Have you scoped and created a map or outline for your text? How will you manage and keep track of content? Are all team members on board?
Who is the Audience?
Open texts are available to a worldwide audience. It is therefore important to consider the audience of your work. For example, do you want to share your teaching resources with other teachers? Or would a specific group of your audience benefit from the resource? Knowing your audience will help you structure your resource.
How Will the Resource be Used?
There are many ways an open text can be used, and it’s important to consider this right at the beginning.
The open text could be used as the key textbook for your course to replace a commercial textbook, or as extra content to support students’ deeper understanding of a subject. Other possibilities include a workbook, guide, or Mini-Repo which is a mini repository of resources supporting a specific topic, subject, or theme.
What Type of Resource Do You Want to Publish?
Open texts are only one kind of OER. Like their commercial counterparts, open texts can include ancillary assets such as instructor notes, lecture slides, quizzes, case studies, and other learning resources. Consider whether your text would benefit from the inclusion of other resources. You’re very likely to create this content for your course, and including ancillary materials with your open text increases the usability, and makes it more attractive for adoption by other educators.
Format
Open resources can be created in a range of formats. These include text and multimedia such as videos, sound files, images, datasets, file sets, slides and other content that supports teaching. Consider what format would best engage your audience in your work. If it’s a book, it can be made available in a range of accessible digital formats such as pdf, HTML, and epub files, as well as print versions.
In LibreTexts, you can create, adapt, and share OER, as well as include ancillary assets, interactive ADAPT, Forge, & Jupyter assessments, and more.
2. Remix, Write, & Create
This phase is where the most time is spent on your open text. This stage includes heavy intellectual work: creation of new content and/or adaptation of existing OER content, and includes being mindful of copyright, accessibility, academic integrity, and diversity and inclusion.
Will You be Remixing Works Created by Others?
Sharing your work as an open resource will impact whether and how you can use content created by others.
If you are looking for content such as images or videos to add to your open educational resource, it’s best to use content that has either a Creative Commons or open license, or is considered public domain.
Who is the Author/Creator?
You might be the only person to work on a resource, or it may be the collaborative effort of a team.
3. Review & Edit
Quality assurance is an essential part of an OER publishing workflow and it is recommended to have your text reviewed by a suitable reviewer(s) with disciplinary knowledge of your text’s topic, copyediting and proofreading, as well as copyright and accessibility. Additional team members can be added to your project with these reviewer roles in mind. Reviews, edits, and remediations can be done directly in LibreTexts from the Conductor project dashboard.
4. Publish & Share
Once reviews and remediations are complete and you are happy with your text, it's time for your book to be published!
What Creative Commons License will you use?
Sharing and reusing is the heart of open texts, and a specific license exists to enable these activities. A Creative Commons license allows others to reuse your work, provided they attribute you as the creator. Essentially, assigning a Creative Commons license to a work indicates to others that you (as the author) are granting permission to (re)use the content. Different Creative Commons licenses provide a range of permissions and obligations for users, and as the author, you need to select a license that best meets your needs.
We'll explore the step-by-step process to publish your text next.
5. Evaluate & Maintain
You can measure the reach and impact of your open text through analytics, adoptions, reviews and student feedback. Additionally, as an author/creator, consider maintaining your completed open text by updating content when necessary and correcting any identified typos or errors. These steps are recommended for the ongoing quality, relevance and sustainability of your book.
Do You Require Any Support to Create Your Resource?
Think about any support you might need before you start publishing your resource. Some ideas could include:
- finding OER relevant to your discipline
- using LibreTexts Remixer and/or Conductor to publish your work
- creating interactive content with ADAPT, Forge, Jupyter, or other interactives
- guidance with Creative Commons and copyright licensing
- creating Accessible and inclusive content
Attribution
This page has been adapted from: Open Publishing Guide for Authors Copyright © 2023 by University of Southern Queensland is licensed under a Creative Commons Attribution-NonCommercial 4.0 International License, except where otherwise noted.