

9.3: Editing a Page
- Page ID
- 406110

\( \newcommand{\vecs}[1]{\overset { \scriptstyle \rightharpoonup} {\mathbf{#1}} } \)
\( \newcommand{\vecd}[1]{\overset{-\!-\!\rightharpoonup}{\vphantom{a}\smash {#1}}} \)
\( \newcommand{\dsum}{\displaystyle\sum\limits} \)
\( \newcommand{\dint}{\displaystyle\int\limits} \)
\( \newcommand{\dlim}{\displaystyle\lim\limits} \)
\( \newcommand{\id}{\mathrm{id}}\) \( \newcommand{\Span}{\mathrm{span}}\)
( \newcommand{\kernel}{\mathrm{null}\,}\) \( \newcommand{\range}{\mathrm{range}\,}\)
\( \newcommand{\RealPart}{\mathrm{Re}}\) \( \newcommand{\ImaginaryPart}{\mathrm{Im}}\)
\( \newcommand{\Argument}{\mathrm{Arg}}\) \( \newcommand{\norm}[1]{\| #1 \|}\)
\( \newcommand{\inner}[2]{\langle #1, #2 \rangle}\)
\( \newcommand{\Span}{\mathrm{span}}\)
\( \newcommand{\id}{\mathrm{id}}\)
\( \newcommand{\Span}{\mathrm{span}}\)
\( \newcommand{\kernel}{\mathrm{null}\,}\)
\( \newcommand{\range}{\mathrm{range}\,}\)
\( \newcommand{\RealPart}{\mathrm{Re}}\)
\( \newcommand{\ImaginaryPart}{\mathrm{Im}}\)
\( \newcommand{\Argument}{\mathrm{Arg}}\)
\( \newcommand{\norm}[1]{\| #1 \|}\)
\( \newcommand{\inner}[2]{\langle #1, #2 \rangle}\)
\( \newcommand{\Span}{\mathrm{span}}\) \( \newcommand{\AA}{\unicode[.8,0]{x212B}}\)
\( \newcommand{\vectorA}[1]{\vec{#1}} % arrow\)
\( \newcommand{\vectorAt}[1]{\vec{\text{#1}}} % arrow\)
\( \newcommand{\vectorB}[1]{\overset { \scriptstyle \rightharpoonup} {\mathbf{#1}} } \)
\( \newcommand{\vectorC}[1]{\textbf{#1}} \)
\( \newcommand{\vectorD}[1]{\overrightarrow{#1}} \)
\( \newcommand{\vectorDt}[1]{\overrightarrow{\text{#1}}} \)
\( \newcommand{\vectE}[1]{\overset{-\!-\!\rightharpoonup}{\vphantom{a}\smash{\mathbf {#1}}}} \)
\( \newcommand{\vecs}[1]{\overset { \scriptstyle \rightharpoonup} {\mathbf{#1}} } \)
\(\newcommand{\longvect}{\overrightarrow}\)
\( \newcommand{\vecd}[1]{\overset{-\!-\!\rightharpoonup}{\vphantom{a}\smash {#1}}} \)
\(\newcommand{\ket}[1]{\left| #1 \right>}\)
\(\newcommand{\bra}[1]{\left< #1 \right|}\)
\(\newcommand{\braket}[2]{\left< #1 \vphantom{#2} \right| \left. #2 \vphantom{#1} \right>}\)
\(\newcommand{\braopket}[3]{\left< #1 \vphantom{#2}\vphantom{#3} \right| #2 \vphantom{#1}\vphantom{#3} \left| #3 \vphantom{#1}\vphantom{#2} \right>}\)
\(\newcommand{\qmvec}[1]{\mathbf{\vec{#1}}}\)
\(\newcommand{\op}[1]{\hat{\mathbf{#1}}}\)
\(\newcommand{\expect}[1]{\langle #1 \rangle}\)
\(\newcommand{\dfn}[1]{\emph{\textbf{#1}}}\)
Page edits in LibreTexts uses a modified CKEditor that allows for module construction without having to build/edit the raw source (HTML) code directly.
The LibreTexts editor is a WYSIWYG editor that automatically creates HTML from visual authoring. The editor displays when you create a new page or edit a page. We strongly recommend that you use the Remixer to create new pages as it will automatically renumber chapters and pages as needed after you add the page. The CKEditor is a ready-for-use open source WYSIWYG text editor designed to bring common word processor features directly to web pages, simplifying content creation.
You can only edit pages for which you have editing permission, generally speaking pages in your Conductor Project, your team's Conductor Project if you are a team member, and pages in books that you have created, either de novo or by remixing.
- Navigate to the page you want to edit.
- On the Black toolbar, select Edit. (If the toolbar is grey, it is because 1. you are not signed in, or 2. you do not have editing permissions for the page.)
- Edit the content as necessary.
- In the Why are you making this edit? text field at the top of the page, leave any change notes for other editors or yourself (optional). Edit summaries can be viewed in the page revision history.
- Click Save to save the changes you made.

Automatic saving & Word Counts
- Automatic saving - By default, the LibreTexts libraries autosaves pages every 25 seconds in case your browser crashes or computer restarts so that you can return to the page and pick up where you left off. Upon logging back in to edit, you will receive a yellow banner notification informing you of unsaved edits.

- Word count - A word and character count is displayed in the upper right corner of the editor UI.
The Editor
The Editor has been configured for most of the needs contributors require. The layout is below; please refrain from using the advanced features in red until you are familiar with the Mindtouch structure. The Toolbar is the section located at the top of the editor window. It contains menu buttons that give you access to various functions of CKEditor. All buttons are grouped according to their function and include both simple operations (like basic text styling or formatting) and more advanced features (like inserting media or forms via a dialog window).

You are responsible for the content that you provide, including but not limited to photos, profiles information, messages, search results edits, and other content that you upload, publish or display on or through LibreTexts, or transmit to or share with other users. You may not submit content to LibreTexts that you did not create or that you do not have permission to submit. You understand and agree that others may, but are not obligated to, edit, delete or remove (without notice) any content from LibreTexts, for any reason or no reason.
Drop-down Menus
Drop-down menus within the Editor Toolbar contain tools organized by Edit, View, Format, Style, Elements, and Help.
Edit Menu
The Edit menu contains the basic actions your authors can use within the editor.
- Undo
- Paste: Paste cut or copied content from your operating system clipboard.
- Modern browsers to not allow Paste as Plain Text or Paste from Word options.
- Find
- Replace
- Select all
View Menu
The View menu allows authors different ways to see the content they'll be editing.
- Source - View and edit the HTML source for the page
- Show blocks - See the content blocks in WYSIWYG mode in order to better identify the HTML structure and format of your content
Format Menu
The Format menu contains tools that allow authors to change the look of selected text.
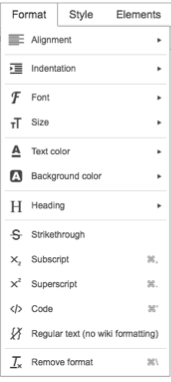
- Alignment
- Indentation
- Font - Change the font for selected text. (DO NOT USE)
- Size
- Text color
- Background color
- Heading - In the pages, the headings start with H2, H1 is reserved for the title of the page
- Strikethrough: Strikes a line through selected text. For example:
these words. - Subscript: Add a small letter or symbol below a line. E.g. writing the chemical compound N2
- Superscript: Add a small letter or symbol above a line of text. E.g. writing equations 23 = 8
- Code: Insert a code block or apply a code block to selected text.
- Regular text: Exclude selected text from being parsed by the editor.
- Remove format: Remove all formatting from the selected content.
Style Menu
The Style menu contains options for changing content behavior or appearance.

- None
- <pre> Format (DO NOT USE)
- Blockquote
- Comment
- Only appears when the page is being edited.
- Great for showing a replaced image when one is updated or corrected.
- Conditional Text (ADVANCED USE ONLY)
- Anonymous only
- <li">Community member only
- Pro Member only
- DekiScript
- JavaScript (JEM)
- CSS
Elements Menu
The Elements menu contains options to insert media or alter HTML elements.

- Insert/Remove bulleted list
- Insert/Remove numbered list
- Definition list
- Insert horizontal line
- Page break
- Insert special character
- Content reuse
- Insert Path (DO NOT USE)
- Video
- Templates
- Link
- Anchor
- Image
- Table
Help Menu
The Help menu links to references about the Editor.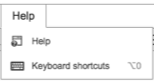
- Help
- Keyboard shortcuts