
11.3: Universal Design
- Last updated
- Save as PDF
- Page ID
- 88207

The first six sections of this chapter discuss how to address accessibility issues for an online environment, along with resources, activities, and assessments, used with face-to-face coursework or a fully online course. If you are just starting out, then you can address these issues and numerous others from the beginning by using Universal Design for Learning (UDL) principles. UDL builds upon universal design concepts from other fields, such as architecture and urban planning, and applies them to learning situations.
The “curb cut” is a common urban planning example used to demonstrate the fundamental idea of UDL. Since the Americans with Disabilities Act of 1990, curb cuts—ramps extending from the street up to the sidewalk—must be present on sidewalks. Curb cuts allow people who use wheelchairs or who have low mobility to go from sidewalk to street and back again more easily. However, to add a curb cut to an existing sidewalk requires a jackhammer and a lot of extra work. Making a sidewalk that was designed with a curb cut from the beginning is much easier. Coming back to UDL, it is often easier to accommodate different learning needs by designing the course with those needs in mind.
As we will see with accessibility solutions for online learning, the curb cut accommodates everyone, not just the original intended audience. Parents with strollers, children walking their bicycles, skateboarders, and more benefit from curb cuts just as much as people in wheelchairs. Along the same lines, the Center for Applied Special Technology (CAST) refers to UDL as “Teaching Every Student,” stating that Universal Design for Learning “calls for
- multiple means of representation to give learners various ways of acquiring information and knowledge,
- multiple means of expression to provide learners alternatives for demonstrating what they know, and
- multiple means of engagement to tap into learners’ interests, challenge them appropriately, and motivate them to learn.” (www.cast.org/research/udl /index.html)
Almost every online accessibility accommodation strategy designed for students with disabilities also helps additional students. For example, English language learners (ESL students) frequently use screen readers that were originally created for people who are blind or who have visual impairments. They benefit from hearing the text spoken out loud as they read a passage of text. Overall, UDL assists students with disabilities, certainly, but also assists students who are non-native language speakers, students with different learning styles, students with different levels of Internet connectivity and access to technology, and even students who require more assistance with self-motivation. Let’s take a look at different ways to apply Universal Design for Learning to your online course.
Multiple Mans of Representation
You probably remember teachers whom you felt gave you everything you needed to succeed when you were a student. These teachers provided handouts in the classroom, links to resources on the Internet, copies of their presentations, and more. You may also remember teachers who did not provide many resources. The resources they did provide may have been text-only documents or handouts that helped a select few students in the class. Perhaps they made one copy of an important set of materials for checkout, requiring you to wait until someone else turned it in before you could review it. This section will give you ideas about ways in which you and, in some cases, your students can provide alternative course materials and resources that increase the number of students who succeed in reaching the objectives.
Sensory input
First, we need to consider the different ways that people get information into their heads and the types of resources that students prefer. Later, we will discuss ways to help students encode and retain any knowledge or skills that they need to succeed in your class or beyond.
Visual-verbal, or text-based resources, help learners who prefer to read. These are usually the most common type of online learning resource, ranging from documents and presentations to web pages. However, text-based resources must be made accessible to people with visual impairments, such as using Optical Character Recognition (OCR) to convert scanned documents to text.
Saving text-based files or documents in various formats also impacts how many people can use them. Consider which technologies your students can access at home, school, or work. Some instructors conduct a short survey at the beginning of a school term to see which software applications students use. Then they save their files in the most common format for that class. Others will save their course documents and text-based class assignments in multiple formats. such as accessible Portable Document Format (PDF) files, Rich Text Format (RTF) files, Hypertext Markup Language (HTML) files, and Microsoft Word (DOC) files. Still others choose a standard format for the class and inform the students that they will need certain software to read, edit, or save course documents.
Each document format listed above has its limitations, so choosing them may depend on what you want to accomplish.
- Any student can open PDF files with a free application called Adobe Reader, available for download at the Adobe website. If you choose this format, you should also provide your students with a link to the download page. However, if students are required to edit the document or to provide feedback on it, then they will require a different application, Adobe Acrobat, that is not free.
- Almost any word processing application can open RTF files, but saving as an RTF file may remove certain types of advanced formatting. Apart from this limitation, this format provides a great deal of flexibility with the types of tasks accomplished through the documents.
- Students with access to a web browser can open HTML files. If you want students to work on an HTML document, though, they will need a web-based HTML editor, an HTML editing application, or a simple text editor combined with knowledge of HTML code.
- Microsoft Word, or DOC, files offer additional options, such as a feature called tracking that allows students to see feedback and suggested changes.
Many people have a copy of Microsoft Word, but it is not universal. Student bookstores and some computer stores carry discounted educational licenses. If you are going to require students to use Microsoft Word, let them know of any labs at your school or university that make it available to those who cannot afford it.
Other text-based file types, such as spreadsheets, provide fewer options. The most common spreadsheet format is a Microsoft Excel (XLS) file. All spreadsheet applications should be able to save files as a Comma Separated Values (CSV) file. However, this would strip out any formulas or calculations that you or the students use.
Looking at ways to spread out your workload over time, you can start with the first strategy, or saving files in one or two of the most common formats for your class, and work your way to the second strategy, or saving files in multiple formats, over time. This does not have to be done in a day, but to achieve Universal Design for Learning it is important to consider these strategies from the beginning. The concept is not to try to accommodate all students with one strategy, but to provide alternatives. The key is to let your students know which formats you will use and provide them with avenues to get what they need to read and use the text-based resources.
Visual-nonverbal, or graphic-based resources, assist learners who prefer graphic-based visual resources, such as images, charts, graphs, flow charts, animations, or videos. Many software applications and some websites allow you to embed charts and graphs within the file itself. You can easily insert images in Microsoft Word. Microsoft Excel allows you and students to create different types of graphs from the data tables. If you use a complex image, such as a political map or a diagram of the digestive system, you must still provide a text-based description for students who use screen readers.
You can use different applications, such as Inspiration, to create stand-alone flow charts or concept maps. If you want young students to be able to interact with this type of file or to create their own, there is a version called Kidspiration as well. See the Inspiration website (http://inspiration.com) for more details. By pushing one button, students can convert Inspiration flow chart or brainstorm files to text-based outlines. This helps students with screen readers as well as visual-verbal learners who prefer the text. Other applications like Inspiration include Microsoft Visio, a free application called SmartDraw, and others. For specialized applications, such as engineering, there are even more. Let your students know if they will need to download or buy any additional software for your course, and work with lab managers to install it at your school or campus if budget permits.
Auditory resources provide alternatives to learners who prefer to hear the information, rather than read it. Screen reader software and text-to-speech applications can be used by many students, not just those students with vision impairments. Schools and universities have different ratios or formulas for how many computer lab stations must have this type of software to accommodate special needs. These ratios usually range from one in twelve to one in twenty computers per lab environment.
In addition, there are other avenues to provide auditory resources to students. For decades, students have placed their tape recorders at the front of the classroom to capture what the instructor says for playback later. These days, the instructor can record him or herself and post the audio file online for all students. As with the other file types, it is important that the students can play and use the files you create. Common audio file formats include the Wave (WAV) file created by Microsoft, the Audio Interchange File Format (AIFF) created by Apple, and the Moving Picture Experts Group’s Audio Layer-3 (MP3) file.
A recent, popular trend for creating and distributing MP3 audio files is called “podcasting.” Different aspects of podcasts and the process of creating and distributing them are described in Chapters 21, Media Selection, and 26, Techno Expression. For our purposes here, it is important to note that you should provide a transcript for any audio files.
Video files also provide appropriate stimuli to auditory learners. Chapter 21, Media Selection, discusses when it is or is not legal to use clips of copyrighted videos as course related resources. One important factor from a UDL standpoint is that streaming video files are often easier for all students to use than downloadable video files. Despite the progress related to high-speed connectivity, not every student has a Digital Subscriber Line (DSL) or equivalent connection at their home, school, or workplace. For students using a dial-up modem, large video files present a very frustrating challenge. Many times the student will spend hours trying to download a large file with no success and will give up. For purposes of accessibility, caption the video or provide a transcript with timecode references to scene changes or other important points.
Tactile/Kinesthetic resources create opportunities for learners who prefer to learn by doing. Resources that accommodate tactile/kinesthetic learners can take different forms. First, you can find or create interactive resources, such as CD-ROMs, websites, or Flash animations, and require the student to follow a linear or nonlinear path through course-specific material. If you do not have time or know how to make these yourself, then you can search a variety of online clearinghouses and repositories for appropriate learning resources. The Multimedia Educational Resource for Learning and Online Teaching, or MERLOT (http://www.merlot.org), is a free website containing thousands of learning resources in the fields of Art, Business, Education, Humanities, Math and Statistics, Science and Technology, and Social Sciences. MERLOT is primarily for higher education instructors, but some materials would be appropriate for secondary school students as well.
Next, you can ask the students to create the resource. In the online environment, this can be as simple as requiring all students to build a glossary of terms for a chapter or topic. You can ask them to send their terms by email, to post them to a threaded discussion, or to post them using a glossary tool that comes with a Learning Management System like Moodle. Other types of student-created resources include databases or spreadsheets containing results of experiments, student or class websites, and student videos.
Finally, more advanced resources act as a framework for student activity, described below. For example, a WebQuest (see http://www.webquest.org) is a web-based research activity that you can find or create for student group work. While most WebQuests are for K–12 students, it is not difficult to create one appropriate for college or university students. The WebQuest is highly interactive and collaborative, making it an ideal online resource for tactile/kinesthetic learners.
Keep in mind that not every resource for students must be stored in the online environment. Some of the most interesting and meaningful lessons require students to interact with the world and then to come back and reflect or report on what they learned. For all types of learners, this increases the number of possible resources to global proportions … literally! Structured activities might involve students performing lab experiments and then completing online lab notebooks; collecting scientific data and then entering it into a communal online database; observing master teachers at a school and then writing a reflective weblog entry; or interviewing an expert and then posting the text, audio, or video file.
Combining strategies means that you can accommodate greater numbers of learning preferences with one resource or activity. For instance, if you use an Excel spreadsheet to demonstrate how increasing and decreasing budgets affected the North and the South in the US Civil War, you can require the students to fill in the annual budget numbers themselves and then to create a graph. This strategy accommodates visual-verbal (text-based) learners, visual-nonverbal (graphic-based) learners and tactile/kinesthetic learners.
Perception
Sensory learners prefer fact-based activities and resources. These resources are easier to provide, as most disciplines from the humanities to the sciences have some facts or details related to the topics within. The easiest resources to provide might be references to the textbook, or links to related websites. More in-depth resources could include optional readings, such as advanced articles that apply the concepts discussed in class.
Intuitive learners like reflective activities and resources that require imagination. If you have a topic that requires students to memorize facts to lay a foundation for later application, provide additional, optional resources that introduce the theories related to the facts. You can also encourage students to seek their own connections between theory and facts using an optional activity, such as a discussion forum devoted to a discovery learning approach.
Organization
Inductive learners prefer beginning with meaningful examples before extrapolating the main concepts or theories. In the online environment, you can accommodate inductive learners in both passive and active ways. You can provide a number of examples in a recorded lecturette before describing the concept that they exemplify. In a more active learning activity, you can provide a number of examples and require the students to create a generalization from them by defining patterns. The Biology Success! Project (see the Final Resources section for details) encourages instructors to consider that while inductive activities have been proven to help students with learning disabilities, “it is essential that the instructor create clear guidelines for behavior, provide explicit directions from the outset of the activity, and be prepared to offer extra guidance as necessary.”
Deductive learners prefer starting with more structure, deriving consequences and applications from the concepts and theories. These learners benefit from demonstrations and opportunities to practise what they have learned. Online “lab” experiences can further strengthen or confirm the learning by deductive learners.
To accommodate both inductive and deductive learners, you can provide case studies, results from previous experiments, and other inductive examples alongside descriptions of the general concepts and theories for the deductive learners. You can assign both in whichever order the students prefer, or alternate the order for different assignments whenever applicable. Another method to accommodate both types of learners is a “structured inquiry” exercise. Whichever approach and activity you choose, remember to be clear about what is expected or what students should do. Identifying the instructor’s expectations is not a discovery learning exercise!
Processing
Active learners enjoy learning by applying knowledge or by working with others. Providing areas where students can interact online, such as instant message (IM) environments, discussion forums, or wikis, will give these students a way to do this. Learning Management Systems usually contain several of these tools for interaction. These tools can be used to create both general course spaces for interaction—related to coursework only, of course—and specific spaces for particular topics or assignments. It is important to create clear instructions and expectations for each interaction space, so students know its purpose and whether or not participation is required.
Make sure that you test the true accessibility of any technology-based areas for interaction. While many companies state that their web-based tools are accessible or compliant, their products are sometimes difficult to use for students using adaptive technologies. You might want to work with a disability resource centre to do some preliminary testing. Further, interaction tools that use Java-based applets or plug-ins do not work with some older browsers, excluding a different group of your students—those with limited technology or limited access to technology.
Reflective learners prefer to ponder the concepts or topic before engaging with it. If you often use small groups in your course, provide opportunities for individual assignments, even if it is just a precursor to the upcoming group work.
People often see themselves as both active and reflective learners, just as they might consider themselves both sensory and intuitive. Therefore, you can try to accommodate both types of learners by mixing up the types of activities. An active learner might prefer the immediacy of a chat. A reflective learner might prefer the asynchronous nature of a discussion forum, as it allows him or her to think about what they want to write before actually committing the words to print.
Understanding
Global learners prefer to see the “big picture” first. Therefore, you can help these students by providing resources that summarize a concept before going into details. One of the simplest examples entails creating a table of contents for a presentation that you post online. If you are creating an audio file, take some time to give a brief introduction to the lecturette or presentation before diving into the first section.
Sequential learners prefer a step-by-step approach, understanding each piece before seeing how it fits in a larger context. One way that you can help sequential learners involves referring to a numbered outline so students can keep track of where you are. Be sure to review flow charts, presentations, and other resources to make sure that you have not skipped or glossed over any steps. If creating audio readings, avoid jumping around from topic to topic. Instead, follow the outline that students will use to keep track of their place.
A common piece of advice for people delivering a presentation for the first time is “Summarize what you are going to say, say it, and then summarize what you said.” This advice accommodates both global and sequential learners.
Preparing students to use multiple means of representation
If students are not prepared to use the variety of content choices you provide, then all your work could be wasted. Let them know how important it is for them to understand the concepts of learning preferences and learning needs, how to determine what their preferences and needs are, and how to adopt strategies that accommodate them. Many instructors ask their students to complete a learning styles survey. This idea is described in more detail below. We can include the learning needs of students with disabilities in this same set of activities. Students with various disabilities also may not know what strategies will benefit them in the online environment. Encourage them to explore how they can succeed in the online components of your course, either on their own or with the help of a disability resource centre.
Multiple Means of Expression
When we think about asking students to demonstrate what they know, we usually think that each student will take the same test, complete the same essay assignment, or perform the same skill(s). It is not too strange, though, to think that students could use different methods to show that they know the same concept. After all, instructors often ask students to choose one of several essay questions to demonstrate understanding of a major topic. These days, instructors are asking students to submit portfolio pieces, sometimes called “assets” or “artifacts,” to show particular competencies. In this process, they may even let the students choose what type of asset they would prefer to submit or how to best show their knowledge or skills. This last idea exemplifies the principle of “multiple means of expression.”
Individuals
When asking individual students to demonstrate knowledge, skills, and/or attitudes using online mechanisms, it is important to determine to what degree of difficulty you are asking the students to achieve the objectives. There are numerous websites that list the different levels of difficulty related to the three learning domains: Cognitive (knowledge), Psychomotor (skills), and Affective (attitudes) (see description of learning domains and degrees of difficulty http://www.nwlink.com/~donclark /hrd/bloom.html). Once you determine what you want students to do, then you can determine how they will demonstrate it. This book contains more information about student activity (Chapter 20, Instructional Strategies) and assessment (Chapter 14, Assessment and Evaluation).
The first step is to identify alternatives that are equivalent. Taking a multiple choice test does not usually demonstrate the same level of proficiency as writing an essay or performing a task in front of a video camera for evaluation later. Therefore, take a close look at the learning objectives, and then make a list of different ways that students could achieve those objectives. Consider the following example objective, “Students will translate Hamlet’s famous ‘to be or not to be’ soliloquy into modern English (with or without slang).” Equivalent online assessment alternatives might include writing a translation in a discussion forum, posting a translation as an attachment, making an online presentation using Skype or other synchronous conference tool, making and posting an audio recording of the student reading their translation, or making and posting a video presentation. The same evaluation guidelines or rubric could be used to evaluate each one. Hypothetically, then, students could choose how they want to show their ability to translate the soliloquy. This accommodates students with disabilities as well as students with different learning preferences. It also creates an avenue to engage students at a higher level, which is described in depth below.
Of course, you will find that certain alternatives may be less equitable. For example, technologies like video cameras and video editing software could be equally difficult to use due to limited access, unequal proficiency levels, or physical disabilities. This does not mean that you have to immediately remove it from the list of options. However, it might require that you identify a lab that checks out cameras to students and that has computers with video editing applications. Another option might be to have students work in small groups, so they can give each other feedback, share technology resources, and help each other with the technology skills that are not part of your course objectives. For an assessment strategy to be universally accessible, students must be able to attempt each alternative, so you may need to limit the options to those that you know all students can try if they wish.
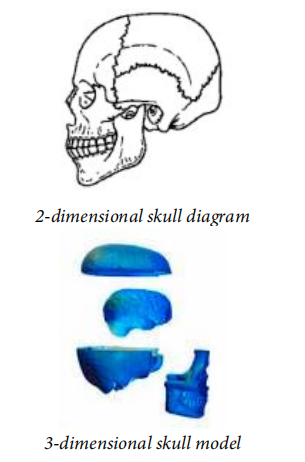
Even within a standardized test format, there may be ways to offer options to students. In a face-to-face environment there are ways to accommodate different needs without giving test answers to the student. For example, on a test requiring students to identify the different bones in the skull, the instructor can provide a threedimensional model of a skull for a blind student to use instead of a flat image (see Figure 11.1 below). The same option is possible for an online test, but it would still require the student to have the model skull at an online testing location.
As stated earlier in this section, activities that involve specialized software or online environments should be tested for accessibility and assessed related to how many students have access to the software or environment itself. However, many of the tools go beyond the simple process of creating and automatically grading test questions. Learning Management Systems (described in Chapter 7, Learning Management Systems) offer a variety of testing options, such as creating separate versions of a timed test to accommodate students who need extra time for exams. The Biology Success! Teaching Diverse Learners project (n.d.) gives us “Key Principles of Assessment as Applied to Students with Learning Disabilities” that we can use in the online environment, too:
- Make clear all assessment criteria
- Make assessments frequent
- Allow for ongoing revision of student work
- Use varied and alternative assessments
- [Provide opportunities for student] self-assessment
Groups
Group work in the online environment provides some real challenges and some tangible benefits. It is sometimes hard to keep track of which student has contributed to the team effort, but students will all gain team-related experience that will help them in research and work environments. One strategy to determine each group member’s contributions is to have each student first perform each group task individually. Then each group member can share his or her work online, using a discussion forum, wiki, or other collaboration tool, to combine the best efforts from the team as a whole. Another strategy involves assigning specific roles to each group member. Most WebQuest exercises (briefly described above) require students to take a role and complete tasks accordingly. Then each student’s work can be assessed individually, in addition to assessing the level of team or group success.
Entire class
The whole class can construct knowledge together in various ways. It is difficult to give the entire class multiple, simultaneous avenues to show it can achieve a certain goal. However, you can construct assignments and activities over the course of the term that gives the class different ways to achieve the desired goals. One way to do this is to assign small groups to make presentations about each week’s content. As you go through a term, the entire class has an opportunity to add to a growing knowledge base of course-related material.
Multiple Means of Engagement
Just as students have different learning preferences and different learning needs, they have different motivations, and levels of motivation, to be successful learners. A certain number of students may be the first member of their family to attend college, so they want to do well. Some may want to achieve financial independence, so they put in extra effort to have high level skills and high quality products to show potential employers. Others may just have a passion for the discipline or specific course content. The UDL principle, “multiple means of engagement,” tells us that we should find out what motivates our students and to challenge them to use those motivations to be successful online learners.
Involve students in the process
To whatever extent you feel comfortable, involve the students in the process of preparing and conducting the online portion of your course or your fully online course. Just as the chemistry of each face-to-face class is different—sometimes the group is energetic or rambunctious, sometimes the group is quiet and difficult to motivate—each online cohort is different. After defining the course objectives, provide a forum for the students to state their expectations. Most times, you will find that the student expectations are very similar to your objectives, but with a different focus, such as applying the knowledge to get a job or using skills from the course to create a portfolio demonstrating their abilities. Using your syllabus, an opening statement, or other strategy, encourage students with special needs to tell you what strategies they have found helpful for their success in past experiences with online coursework. They may already have accessibility or even UDL solutions that could save you countless hours of research.
Another way to engage students is to involve them in their own learning. In the Multiple Means of Representation subsection above, we cover different ways to accommodate learning styles, learning preferences, learning needs, and so on. However, as an instructor, there is only so much you can do before the student must take responsibility for him or herself. Ask your students to take an Index of Learning Styles (ILS) questionnaire, such as the one created by Richard Felder and Barbara Solomon of North Carolina State University (listed in the Final Resources section) Then have the students report what they find about themselves and identify strategies that they will use to improve their own learning. Sometimes the questionnaire results do not match how we see ourselves. That is okay. Just let your students know that this exercise is to make them aware of different learning possibilities. They should try strategies that accommodate their perceived learning styles as well as the ones that the questionnaire results identify for them.
Determine what students find meaningful
To keep students motivated to work in the online environment, they will need to find the objectives, topics, resources, and activities meaningful. An instructor-led approach could range from “This material is a prerequisite to other courses in this program” to “These skills will help you get jobs in this field.” A student-led approach could range from “This is how these theories apply to real-world events” to “Some of you will find this really cool!” Both approaches have their merits, so use them together. To determine what real-world events interest students, or to find what they feel is really cool, talk to some of the students before the term gets rolling, or ask the class to send you one idea of each.
Ask for feedback
In Chapter 24, Evaluating and Improving Online Teaching Effectiveness, we cover a number of ways to get feedback from students. Using those strategies, you can include questions about motivation or engagement to learn how well you are doing to get students more involved in their learning success. Go over the results with the class to come up with additional ideas or inspirations.
Bringing It All Together
Looking at some of the concepts and suggestions in this section, you might be asking yourself, “This is helpful, but what does this have to do with accessibility?” For this book, remember that the term “accessibility” refers to the extent to which it is possible for all students to succeed in our collective online course environments.