4.2.2: Taking Notes
- Last updated
- Save as PDF
- Page ID
- 151878
\( \newcommand{\vecs}[1]{\overset { \scriptstyle \rightharpoonup} {\mathbf{#1}} } \)
\( \newcommand{\vecd}[1]{\overset{-\!-\!\rightharpoonup}{\vphantom{a}\smash {#1}}} \)
\( \newcommand{\dsum}{\displaystyle\sum\limits} \)
\( \newcommand{\dint}{\displaystyle\int\limits} \)
\( \newcommand{\dlim}{\displaystyle\lim\limits} \)
\( \newcommand{\id}{\mathrm{id}}\) \( \newcommand{\Span}{\mathrm{span}}\)
( \newcommand{\kernel}{\mathrm{null}\,}\) \( \newcommand{\range}{\mathrm{range}\,}\)
\( \newcommand{\RealPart}{\mathrm{Re}}\) \( \newcommand{\ImaginaryPart}{\mathrm{Im}}\)
\( \newcommand{\Argument}{\mathrm{Arg}}\) \( \newcommand{\norm}[1]{\| #1 \|}\)
\( \newcommand{\inner}[2]{\langle #1, #2 \rangle}\)
\( \newcommand{\Span}{\mathrm{span}}\)
\( \newcommand{\id}{\mathrm{id}}\)
\( \newcommand{\Span}{\mathrm{span}}\)
\( \newcommand{\kernel}{\mathrm{null}\,}\)
\( \newcommand{\range}{\mathrm{range}\,}\)
\( \newcommand{\RealPart}{\mathrm{Re}}\)
\( \newcommand{\ImaginaryPart}{\mathrm{Im}}\)
\( \newcommand{\Argument}{\mathrm{Arg}}\)
\( \newcommand{\norm}[1]{\| #1 \|}\)
\( \newcommand{\inner}[2]{\langle #1, #2 \rangle}\)
\( \newcommand{\Span}{\mathrm{span}}\) \( \newcommand{\AA}{\unicode[.8,0]{x212B}}\)
\( \newcommand{\vectorA}[1]{\vec{#1}} % arrow\)
\( \newcommand{\vectorAt}[1]{\vec{\text{#1}}} % arrow\)
\( \newcommand{\vectorB}[1]{\overset { \scriptstyle \rightharpoonup} {\mathbf{#1}} } \)
\( \newcommand{\vectorC}[1]{\textbf{#1}} \)
\( \newcommand{\vectorD}[1]{\overrightarrow{#1}} \)
\( \newcommand{\vectorDt}[1]{\overrightarrow{\text{#1}}} \)
\( \newcommand{\vectE}[1]{\overset{-\!-\!\rightharpoonup}{\vphantom{a}\smash{\mathbf {#1}}}} \)
\( \newcommand{\vecs}[1]{\overset { \scriptstyle \rightharpoonup} {\mathbf{#1}} } \)
\(\newcommand{\longvect}{\overrightarrow}\)
\( \newcommand{\vecd}[1]{\overset{-\!-\!\rightharpoonup}{\vphantom{a}\smash {#1}}} \)
\(\newcommand{\avec}{\mathbf a}\) \(\newcommand{\bvec}{\mathbf b}\) \(\newcommand{\cvec}{\mathbf c}\) \(\newcommand{\dvec}{\mathbf d}\) \(\newcommand{\dtil}{\widetilde{\mathbf d}}\) \(\newcommand{\evec}{\mathbf e}\) \(\newcommand{\fvec}{\mathbf f}\) \(\newcommand{\nvec}{\mathbf n}\) \(\newcommand{\pvec}{\mathbf p}\) \(\newcommand{\qvec}{\mathbf q}\) \(\newcommand{\svec}{\mathbf s}\) \(\newcommand{\tvec}{\mathbf t}\) \(\newcommand{\uvec}{\mathbf u}\) \(\newcommand{\vvec}{\mathbf v}\) \(\newcommand{\wvec}{\mathbf w}\) \(\newcommand{\xvec}{\mathbf x}\) \(\newcommand{\yvec}{\mathbf y}\) \(\newcommand{\zvec}{\mathbf z}\) \(\newcommand{\rvec}{\mathbf r}\) \(\newcommand{\mvec}{\mathbf m}\) \(\newcommand{\zerovec}{\mathbf 0}\) \(\newcommand{\onevec}{\mathbf 1}\) \(\newcommand{\real}{\mathbb R}\) \(\newcommand{\twovec}[2]{\left[\begin{array}{r}#1 \\ #2 \end{array}\right]}\) \(\newcommand{\ctwovec}[2]{\left[\begin{array}{c}#1 \\ #2 \end{array}\right]}\) \(\newcommand{\threevec}[3]{\left[\begin{array}{r}#1 \\ #2 \\ #3 \end{array}\right]}\) \(\newcommand{\cthreevec}[3]{\left[\begin{array}{c}#1 \\ #2 \\ #3 \end{array}\right]}\) \(\newcommand{\fourvec}[4]{\left[\begin{array}{r}#1 \\ #2 \\ #3 \\ #4 \end{array}\right]}\) \(\newcommand{\cfourvec}[4]{\left[\begin{array}{c}#1 \\ #2 \\ #3 \\ #4 \end{array}\right]}\) \(\newcommand{\fivevec}[5]{\left[\begin{array}{r}#1 \\ #2 \\ #3 \\ #4 \\ #5 \\ \end{array}\right]}\) \(\newcommand{\cfivevec}[5]{\left[\begin{array}{c}#1 \\ #2 \\ #3 \\ #4 \\ #5 \\ \end{array}\right]}\) \(\newcommand{\mattwo}[4]{\left[\begin{array}{rr}#1 \amp #2 \\ #3 \amp #4 \\ \end{array}\right]}\) \(\newcommand{\laspan}[1]{\text{Span}\{#1\}}\) \(\newcommand{\bcal}{\cal B}\) \(\newcommand{\ccal}{\cal C}\) \(\newcommand{\scal}{\cal S}\) \(\newcommand{\wcal}{\cal W}\) \(\newcommand{\ecal}{\cal E}\) \(\newcommand{\coords}[2]{\left\{#1\right\}_{#2}}\) \(\newcommand{\gray}[1]{\color{gray}{#1}}\) \(\newcommand{\lgray}[1]{\color{lightgray}{#1}}\) \(\newcommand{\rank}{\operatorname{rank}}\) \(\newcommand{\row}{\text{Row}}\) \(\newcommand{\col}{\text{Col}}\) \(\renewcommand{\row}{\text{Row}}\) \(\newcommand{\nul}{\text{Nul}}\) \(\newcommand{\var}{\text{Var}}\) \(\newcommand{\corr}{\text{corr}}\) \(\newcommand{\len}[1]{\left|#1\right|}\) \(\newcommand{\bbar}{\overline{\bvec}}\) \(\newcommand{\bhat}{\widehat{\bvec}}\) \(\newcommand{\bperp}{\bvec^\perp}\) \(\newcommand{\xhat}{\widehat{\xvec}}\) \(\newcommand{\vhat}{\widehat{\vvec}}\) \(\newcommand{\uhat}{\widehat{\uvec}}\) \(\newcommand{\what}{\widehat{\wvec}}\) \(\newcommand{\Sighat}{\widehat{\Sigma}}\) \(\newcommand{\lt}{<}\) \(\newcommand{\gt}{>}\) \(\newcommand{\amp}{&}\) \(\definecolor{fillinmathshade}{gray}{0.9}\)Questions to consider
- How can you prepare to take notes to maximize the effectiveness of the experience?
- What are some specific strategies you can employ for better notetaking?
- Why is annotating your notes after the notetaking session a critical step to follow?
Beyond providing a record of the information you are reading or hearing, notes help you organize the ideas and help you make meaning out of something about which you may not be familiar, so notetaking and reading are two compatible skill sets. Taking notes also helps you stay focused on the question at hand. Nanami often takes notes during presentations or class lectures so she can follow the speaker’s main points and condense the material into a more readily usable format. Strong notes build on your prior knowledge of a subject, help you discuss trends or patterns present in the information, and direct you toward areas needing further research or reading.

It is not a good habit to transcribe every single word a speaker utters—even if you have an amazing ability to do that. Most of us don’t have that court-reporter-esque skill level anyway, and if we try, we would end up missing valuable information. Learn to listen for main ideas and distinguish between these main ideas and details that typically support the ideas. Include examples that explain the main ideas, but do so using understandable abbreviations.
Think of all notes as potential study guides. In fact, if you only take notes without actively working on them after the initial notetaking session, the likelihood of the notes helping you is slim. Research on this topic concludes that without active engagement after taking notes, most students forget 60–75 percent of material over which they took the notes—within two days! That sort of defeats the purpose, don’t you think? This information about memory loss was first brought to light by 19th-century German psychologist Hermann Ebbinghaus. Fortunately, you do have the power to thwart what is sometimes called the Ebbinghaus Forgetting Curve by reinforcing what you learned through review at intervals shortly after you take in the material and frequently thereafter.
If you are a musician, you’ll understand this phenomenon well. When you first attempt a difficult piece of music, you may not remember the chords and notes well at all, but after frequent practice and review, you generate a certain muscle memory and cognitive recall that allows you to play the music more easily.
Notetaking may not be the most glamorous aspect of your higher-education journey, but it is a study practice you will carry throughout college and into your professional life. Setting yourself up for successful notetaking is almost as important as the actual taking of notes, and what you do after your notetaking session is equally significant. Well-written notes help you organize your thoughts, enhance your memory, and participate in class discussion, and they prepare you to respond successfully on exams. With all that riding on your notes, it would behoove you to learn how to take notes properly and continue to improve your notetaking skills.
Analysis Question
Do you currently have a preferred way to take notes? When did you start using it? Has it been effective? What other strategy might work for you?
Preparing to Take Notes
Preparing to take notes means more than just getting out your laptop or making sure you bring pen and paper to class. You’ll do a much better job with your notes if you understand why we take notes, have a strong grasp on your preferred notetaking system, determine your specific priorities depending on your situation, and engage in some version of efficient shorthand.
Like handwriting and fingerprints, we all have unique and fiercely independent notetaking habits. These understandably and reasonably vary from one situation to the next, but you can only improve your skills by learning more about ways to take effective notes and trying different methods to find a good fit.
The very best notes are the ones you take in an organized manner that encourages frequent review and use as you progress through a topic or course of study. For this reason, you need to develop a way to organize all your notes for each class so they remain together and organized. As old-fashioned as it sounds, a clunky three-ring binder is an excellent organizational container for class notes. You can easily add to previous notes, insert handouts you may receive in class, and maintain a running collection of materials for each separate course. If the idea of carrying around a heavy binder has you rolling your eyes, then transfer that same structure into your computer files. If you don’t organize your many documents into some semblance of order on your computer, you will waste significant time searching for improperly named or saved files.
You may be interested in relatively new research on what is the more effective notetaking strategy: handwriting versus typing directly into a computer. While individuals have strong personal opinions on this subject, most researchers agree that the format of student notes is less important than what students do with the notes they take afterwards. Both handwriting notes and using a computer for notetaking have pros and cons.
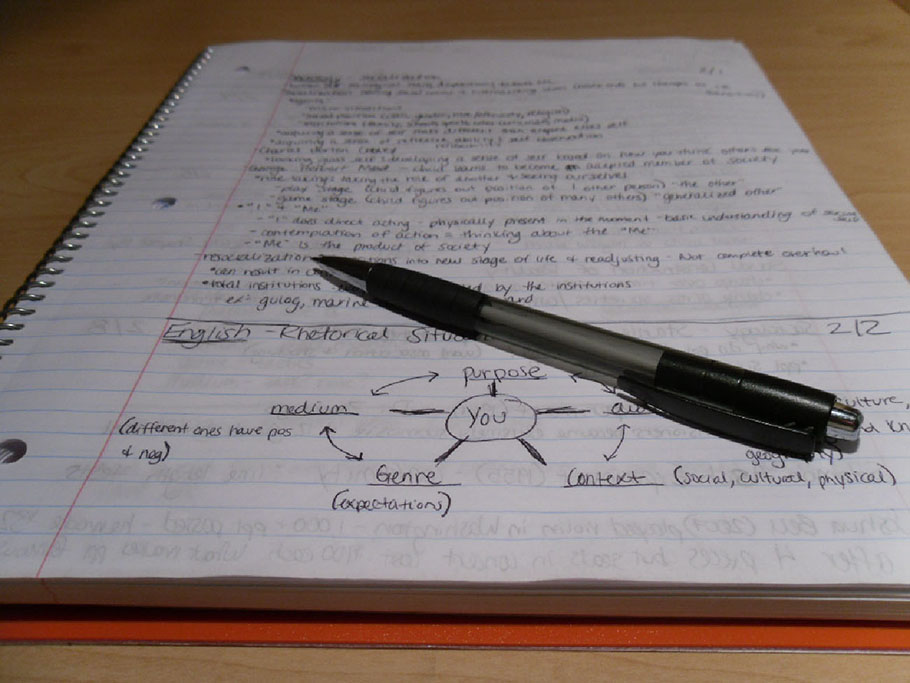
Managing Notetaking Systems (Computer, Paper/Pen, Note Cards, Textbook)
Whichever of the many notetaking systems you choose (and new ones seem to come out almost daily), the very best one is the one that you will use consistently. The skill and art of notetaking is not automatic for anyone; it takes a great deal of practice, patience, and continuous attention to detail. Add to that the fact that you may need to master multiple notetaking techniques for different classes, and you have some work to do. Unless you are specifically directed by your instructor, you are free to combine the best parts of different systems if you are most comfortable with that hybrid system.
Just to keep yourself organized, all your notes should start off with an identifier, including at the very least the date, the course name, the topic of the lecture/presentation, and any other information you think will help you when you return to use the notes for further study, test preparation, or assignment completion. Additional, optional information may be the number of notetaking sessions about this topic or reminders to cross-reference class handouts, textbook pages, or other course materials. It’s also always a good idea to leave some blank space in your notes so you can insert additions and questions you may have as you review the material later.
Notetaking Strategies
You may have a standard way you take all your notes for all your classes. When you were in high school, this one-size-fits-all approach may have worked. Now that you’re in college, reading and studying more advanced topics, your general method may still work some of the time, but you should have some different strategies in place if you find that your method isn’t working as well with college content. You probably will need to adopt different notetaking strategies for different subjects. The strategies in this section represent various ways to take notes in such a way that you are able to study after the initial notetaking session.
Cornell Method
One of the most recognizable notetaking systems is called the Cornell Method, a relatively simple way to take effective notes devised by Cornell University education professor Dr. Walter Pauk in the 1940s. In this system, you take a standard piece of note paper and divide it into three sections by drawing a horizontal line across your paper about one to two inches from the bottom of the page (the summary area) and then drawing a vertical line to separate the rest of the page above this bottom area, making the left side about two inches (the recall column) and leaving the biggest area to the right of your vertical line (the notes column). You may want to make one page and then copy as many pages as you think you’ll need for any particular class, but one advantage of this system is that you can generate the sections quickly. Because you have divided up your page, you may end up using more paper than you would if you were writing on the entire page, but the point is not to keep your notes to as few pages as possible. The Cornell Method provides you with a well-organized set of notes that will help you study and review your notes as you move through the course. If you are taking notes on your computer, you can still use the Cornell Method in Word or Excel on your own or by using a template someone else created.
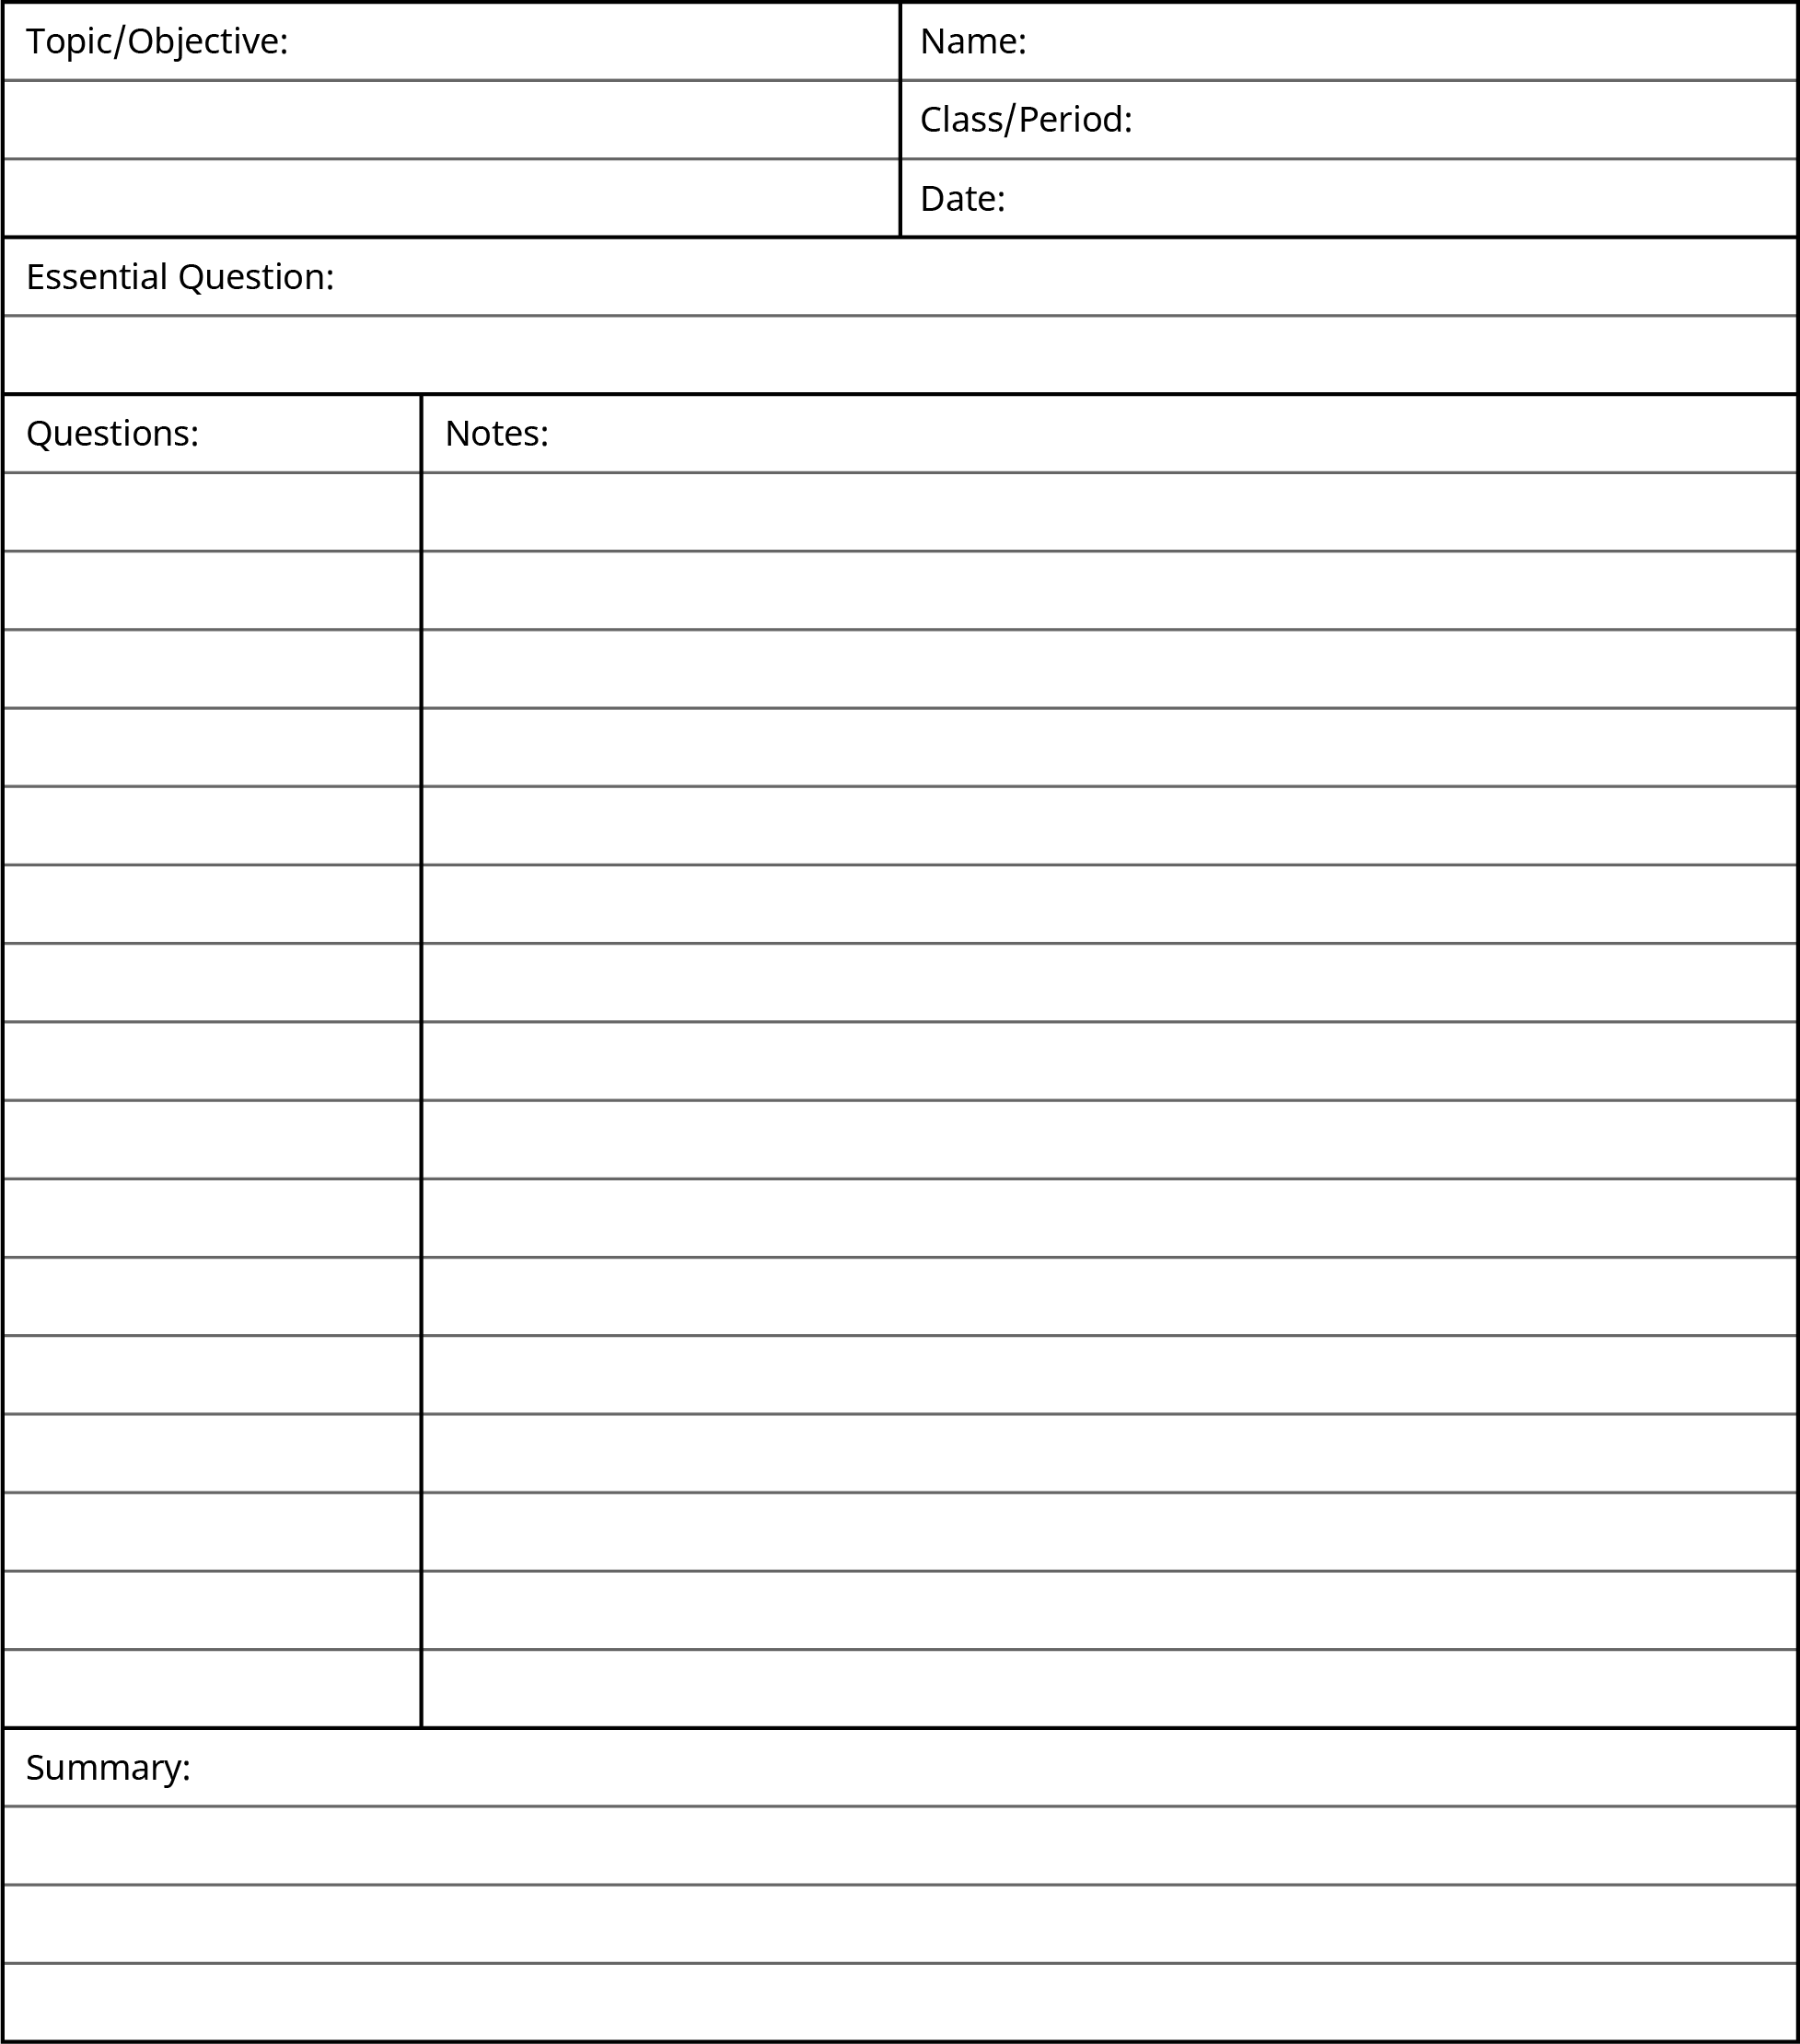
Now that you have the notetaking format generated, the beauty of the Cornell Method is its organized simplicity. Just write on one side of the page (the right-hand notes column)—this will help later when you are reviewing and revising your notes. During your notetaking session, use the notes column to record information over the main points and concepts of the lecture; try to put the ideas into your own words, which will help you not transcribe the speaker’s words verbatim. Skip lines between each idea in this column. Practice the shortcut abbreviations covered in the next section and avoid writing in complete sentences. Don’t make your notes too cryptic, but you can use bullet points or phrases equally well to convey meaning—we do it all the time in conversation. If you know you will need to expand the notes you are taking in class but don’t have time, you can put reminders directly in the notes by adding and underlining the word expand by the ideas you need to develop more fully.
As soon as possible after your notetaking session, preferably within eight hours but no more than twenty-four hours, read over your notes column and fill in any details you missed in class, including the places where you indicated you wanted to expand your notes. Then in the recall column, write any key ideas from the corresponding notes column—you can’t stuff this smaller recall column as if you’re explaining or defining key ideas. Just add the one- or two-word main ideas; these words in the recall column serve as cues to help you remember the detailed information you recorded in the notes column.
Once you are satisfied with your notes and recall columns, summarize this page of notes in two or three sentences using the summary area at the bottom of the sheet. This is an excellent time to get with another classmate or a group of students who all heard the same lecture to make sure you all understood the key points. Now, before you move onto something else, cover the large notes column, and quiz yourself over the key ideas you recorded in the recall column. Repeat this step often as you go along, not just immediately before an exam, and you will help your memory make the connections between your notes, your textbook reading, your in-class work, and assignments that you need to succeed on any quizzes and exams.
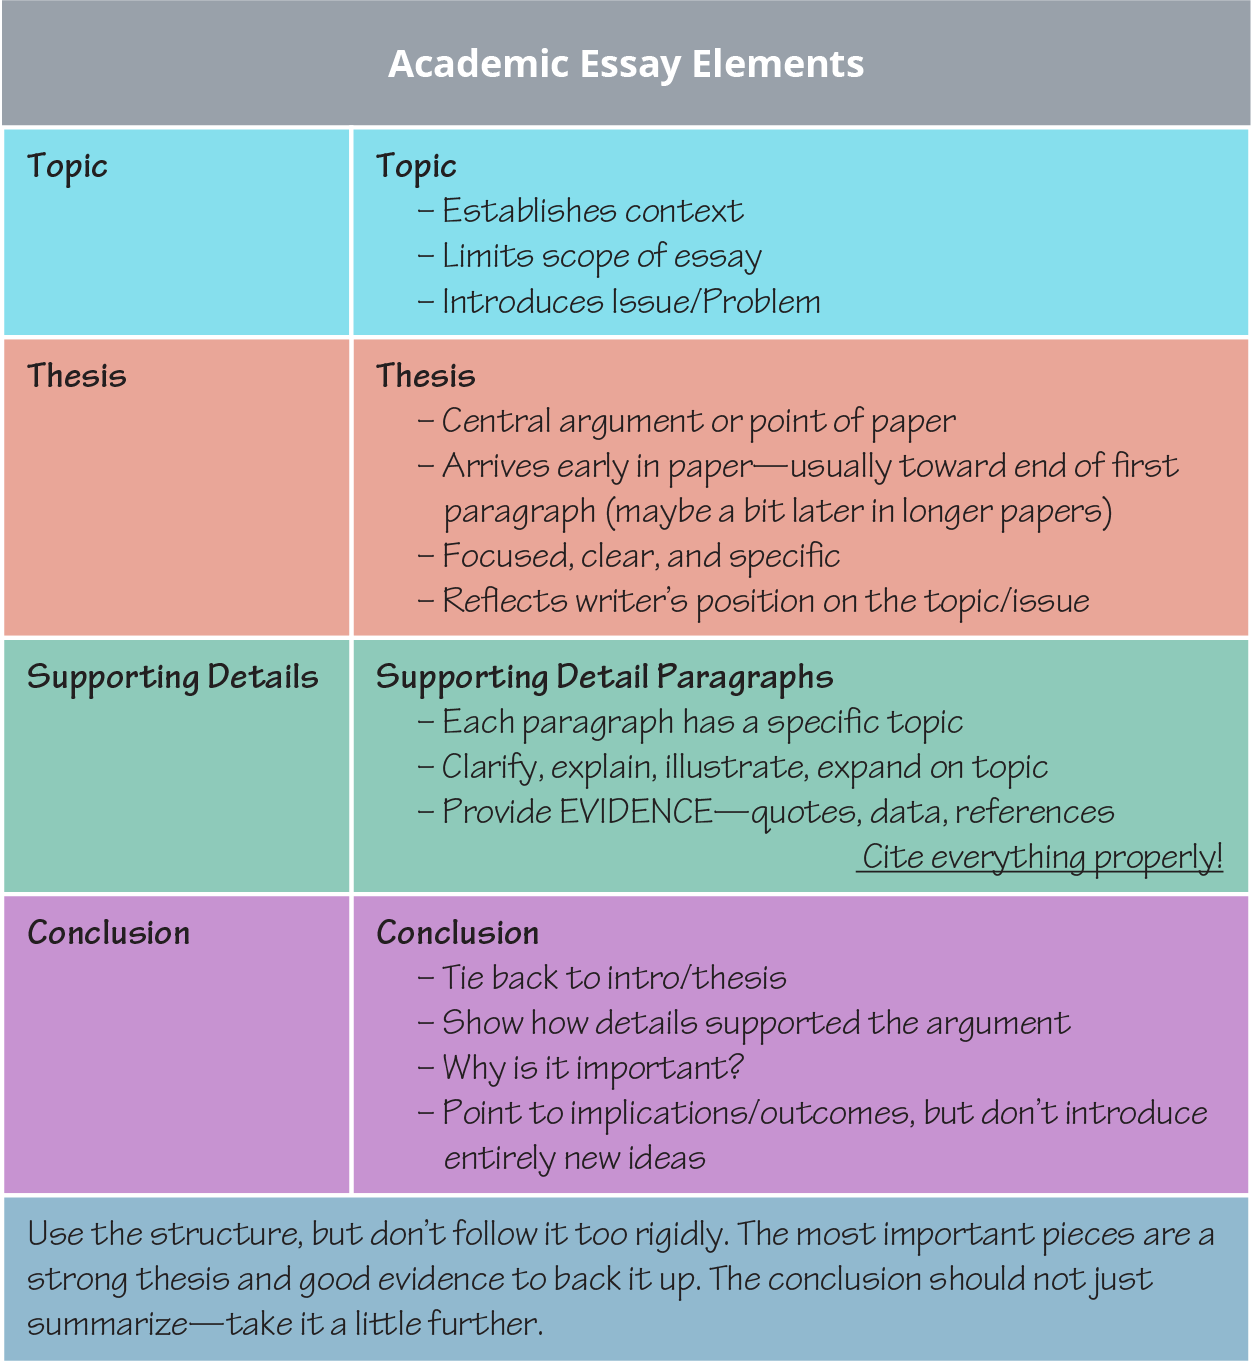
The main advantage of the Cornell Method is that you are setting yourself up to have organized, workable notes. The neat format helps you move into study-mode without needing to re-copy less organized notes or making sense of a large mass of information you aren’t sure how to process because you can’t remember key ideas or what you meant. If you write notes in your classes without any sort of system and later come across something like “Napoleon—short” in the middle of a glob of notes, what can you do at this point? Is that important? Did it connect with something relevant from the lecture? How would you possibly know? You are your best advocate for setting yourself up for success in college.
Outlining
Other note organizing systems may help you in different disciplines. You can take notes in a formal outline if you prefer, using Roman numerals for each new topic, moving down a line to capital letters indented a few spaces to the right for concepts related to the previous topic, then adding details to support the concepts indented a few more spaces over and denoted by an Arabic numeral. You can continue to add to a formal outline by following these rules.
You don’t absolutely have to use the formal numerals and letter, but you have to then be careful to indent so you can tell when you move from a higher level topic to the related concepts and then to the supporting information. The main benefit of an outline is how organized it is. You have to be on your toes when you are taking notes in class to ensure you keep up the organizational format of the outline, which can be tricky if the lecture or presentation is moving quickly or covering many diverse topics.
The following formal outline example shows the basic pattern:
- Dogs (main topic–usually general)
- German Shepherd (concept related to main topic)
- Protection (supporting info about the concept)
- Assertive
- Loyal
- Weimaraner (concept related to main topic)
- Family-friendly (supporting info about the concept)
- Active
- Healthy
- German Shepherd (concept related to main topic)
- Siamese
You would just continue on with this sort of numbering and indenting format to show the connections between main ideas, concepts, and supporting details. Whatever details you do not capture in your notetaking session, you can add after the lecture as you review your outline.
Chart or table
Similar to creating an outline, you can develop a chart to compare and contrast main ideas in a notetaking session. Divide your paper into four or five columns with headings that include either the main topics covered in the lecture or categories such as How?, What?, When used?, Advantages/Pros, Disadvantages/Cons, or other divisions of the information. You write your notes into the appropriate columns as that information comes to light in the presentation.
| Example of a Chart to Organize Ideas and Categories | ||||
| Structure | Types | Functions in Body | Additional Notes | |
| Carbohydrates | ||||
| Lipids | ||||
| Proteins | ||||
| Nucleic Acid | ||||
This format helps you pull out the salient ideas and establishes an organized set of notes to study later. (If you haven’t noticed that this reviewing later idea is a constant across all notetaking systems, you should…take note of that.) Notes by themselves that you never reference again are little more than scribblings. That would be a bit like compiling an extensive grocery list so you stay on budget when you shop, work all week on it, and then just throw it away before you get to the store. You may be able to recall a few items, but likely won’t be as efficient as you could be if you had the notes to reference. Just as you cannot read all the many books, articles, and documents you need to peruse for your college classes, you cannot remember the most important ideas of all the notes you will take as part of your courses, so you must review.
Concept Mapping and Visual Notetaking
One final notetaking method that appeals to learners who prefer a visual representation of notes is called mapping or sometimes mind mapping or concept mapping, although each of these names can have slightly different uses. Variations of this method abound, so you may want to look for more versions online, but the basic principles are that you are making connections between main ideas through a graphic depiction; some can get rather elaborate with colors and shapes, but a simple version may be more useful at least to begin. Main ideas can be circled or placed in a box with supporting concepts radiating off these ideas shown with a connecting line and possibly details of the support further radiating off the concepts. You can present your main ideas vertically or horizontally, but turning your paper long-ways, or in landscape mode, may prove helpful as you add more main ideas.
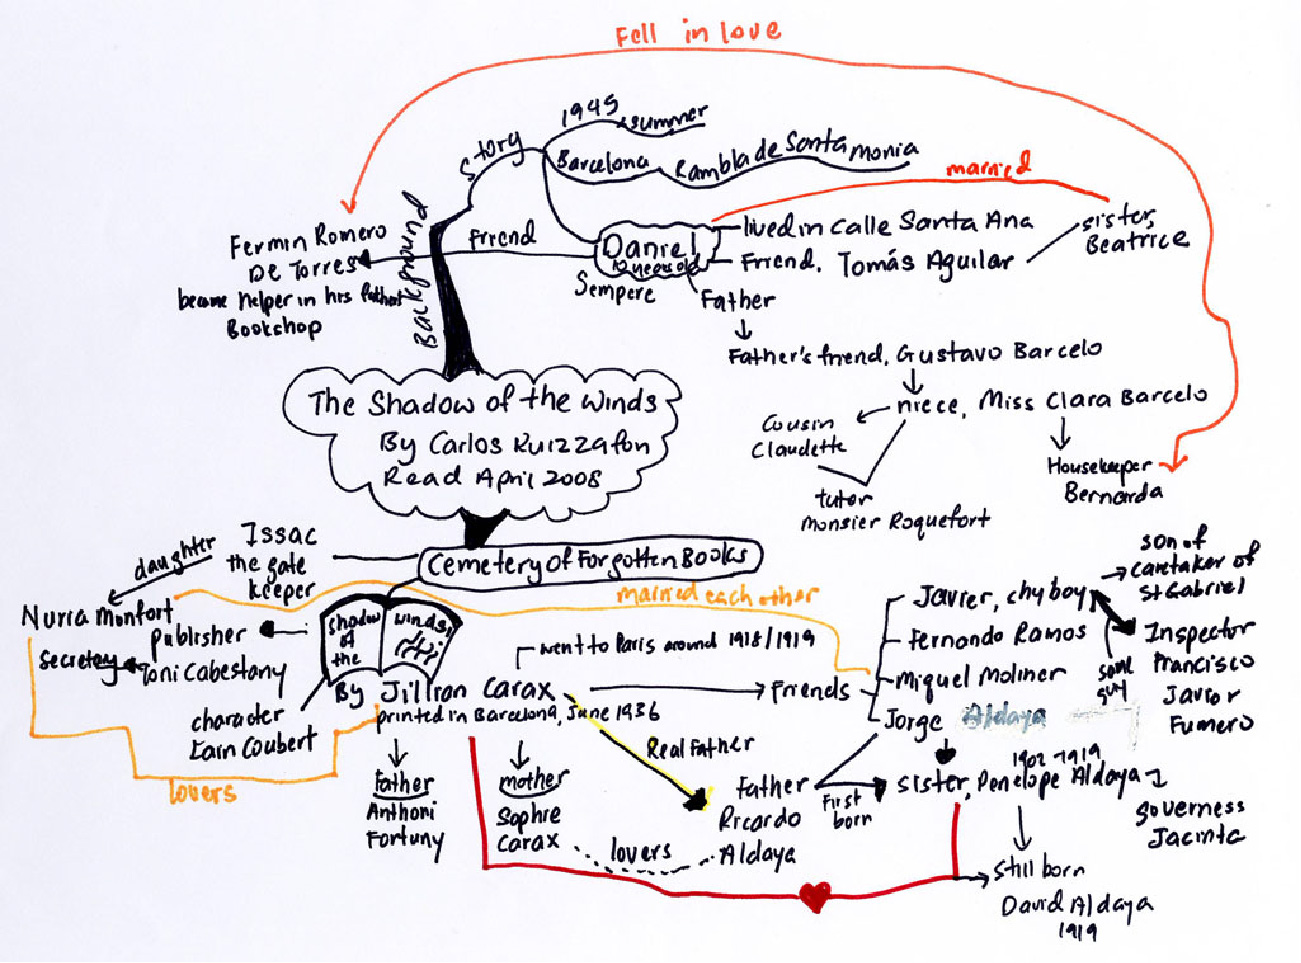
You may be interested in trying visual notetaking or adding pictures to your notes for clarity. Sometimes when you can’t come up with the exact wording to explain something or you’re trying to add information for complex ideas in your notes, sketching a rough image of the idea can help you remember. According to educator Sherrill Knezel in an article entitled “The Power of Visual Notetaking,” this strategy is effective because “When students use images and text in notetaking, it gives them two different ways to pull up the information, doubling their chances of recall.” Don’t shy away from this creative approach to notetaking just because you believe you aren’t an artist; the images don’t need to be perfect. You may want to watch Rachel Smith’s TEDx Talk called “Drawing in Class” to learn more about visual notetaking.
You can play with different types of notetaking suggestions and find the method(s) you like best, but once you find what works for you, stick with it. You will become more efficient with the method the more you use it, and your notetaking, review, and test prep will become, if not easier, certainly more organized, which can delete decrease your anxiety.
Practicing Decipherable Shorthand
Most college students don’t take a class in shorthand, once the domain of secretaries and executive assistants, but maybe they should. That almost-lost art in the age of computers could come in very handy during intense notetaking sessions. Elaborate shorthand systems do exist, but you would be better served in your college notetaking adventures to hone a more familiar, personalized form of shorthand to help you write more in a shorter amount of time. Seemingly insignificant shortcuts can add up to ease the stress notetaking can induce—especially if you ever encounter an “I’m not going to repeat this” kind of presenter! Become familiar with these useful abbreviations:
| Shortcut symbol | Meaning |
| w/, w/o, w/in | with, without, within |
| & | and |
| # | number |
| b/c | because |
| X, √ | incorrect, correct |
| Diff | different, difference |
| etc. | and so on |
| ASAP | as soon as possible |
| US, UK | United States, United Kingdom |
| info | information |
| Measurements: ft, in, k, m | foot, inch, thousand, million |
| ¶ | paragraph or new paragraph |
| Math symbols: =, +, >, <, ÷ | equal, plus, greater, less, divided by |
| WWI, WWII | World Wars I and II |
| impt | important |
| ?, !, ** | denote something is very significant; don't over use |
Do you have any other shortcuts or symbols that you use in your notes? Ask your parents if they remember any that you may be able to learn.
Annotating Notes After Initial Notetaking Session
Annotating notes after the initial notetaking session may be one of the most valuable study skills you can master. Whether you are highlighting, underlining, or adding additional notes, you are reinforcing the material in your mind and memory.
Admit it—who can resist highlighting markers? Gone are the days when yellow was the star of the show, and you had to be very careful not to press too firmly for fear of obliterating the words you were attempting to emphasize. Students now have a veritable rainbow of highlighting options and can color-code notes and text passages to their hearts’ content. Technological advances may be important, but highlighter color choice is monumental! Maybe.
The only reason to highlight anything is to draw attention to it, so you can easily pick out that ever-so-important information later for further study or reflection. One problem many students have is not knowing when to stop. If what you need to recall from the passage is a particularly apt and succinct definition of the term important to your discipline, highlighting the entire paragraph is less effective than highlighting just the actual term. And if you don’t rein in this tendency to color long passages (possibly in multiple colors) you can end up with a whole page of highlighted text. Ironically, that is no different from a page that is not highlighted at all, so you have wasted your time. Your mantra for highlighting text should be less is more. Always read your text selection first before you start highlighting anything. You need to know what the overall message is before you start placing emphasis in the text with highlighting.
Another way to annotate notes after initial notetaking is underlying significant words or passages. Albeit not quite as much fun as its colorful cousin highlighting, underlining provides precision to your emphasis.
Some people think of annotations as only using a colored highlighter to mark certain words or phrases for emphasis. Actually, annotations can refer to anything you do with a text to enhance it for your particular use (either a printed text, handwritten notes, or other sort of document you are using to learn concepts). The annotations may include highlighting passages or vocabulary, defining those unfamiliar terms once you look them up, writing questions in the margin of a book, underlining or circling key terms, or otherwise marking a text for future reference. You can also annotate some electronic texts.
Realistically, you may end up doing all of these types of annotations at different times. We know that repetition in studying and reviewing is critical to learning, so you may come back to the same passage and annotate it separately. These various markings can be invaluable to you as a study guide and as a way to see the evolution of your learning about a topic. If you regularly begin a reading session writing down any questions you may have about the topic of that chapter or section and also write out answers to those questions at the end of the reading selection, you will have a good start to what that chapter covered when you eventually need to study for an exam. At that point, you likely will not have time to reread the entire selection especially if it is a long reading selection, but with strong annotations in conjunction with your class notes, you won’t need to do that. With experience in reading discipline-specific texts and writing essays or taking exams in that field, you will know better what sort of questions to ask in your annotations
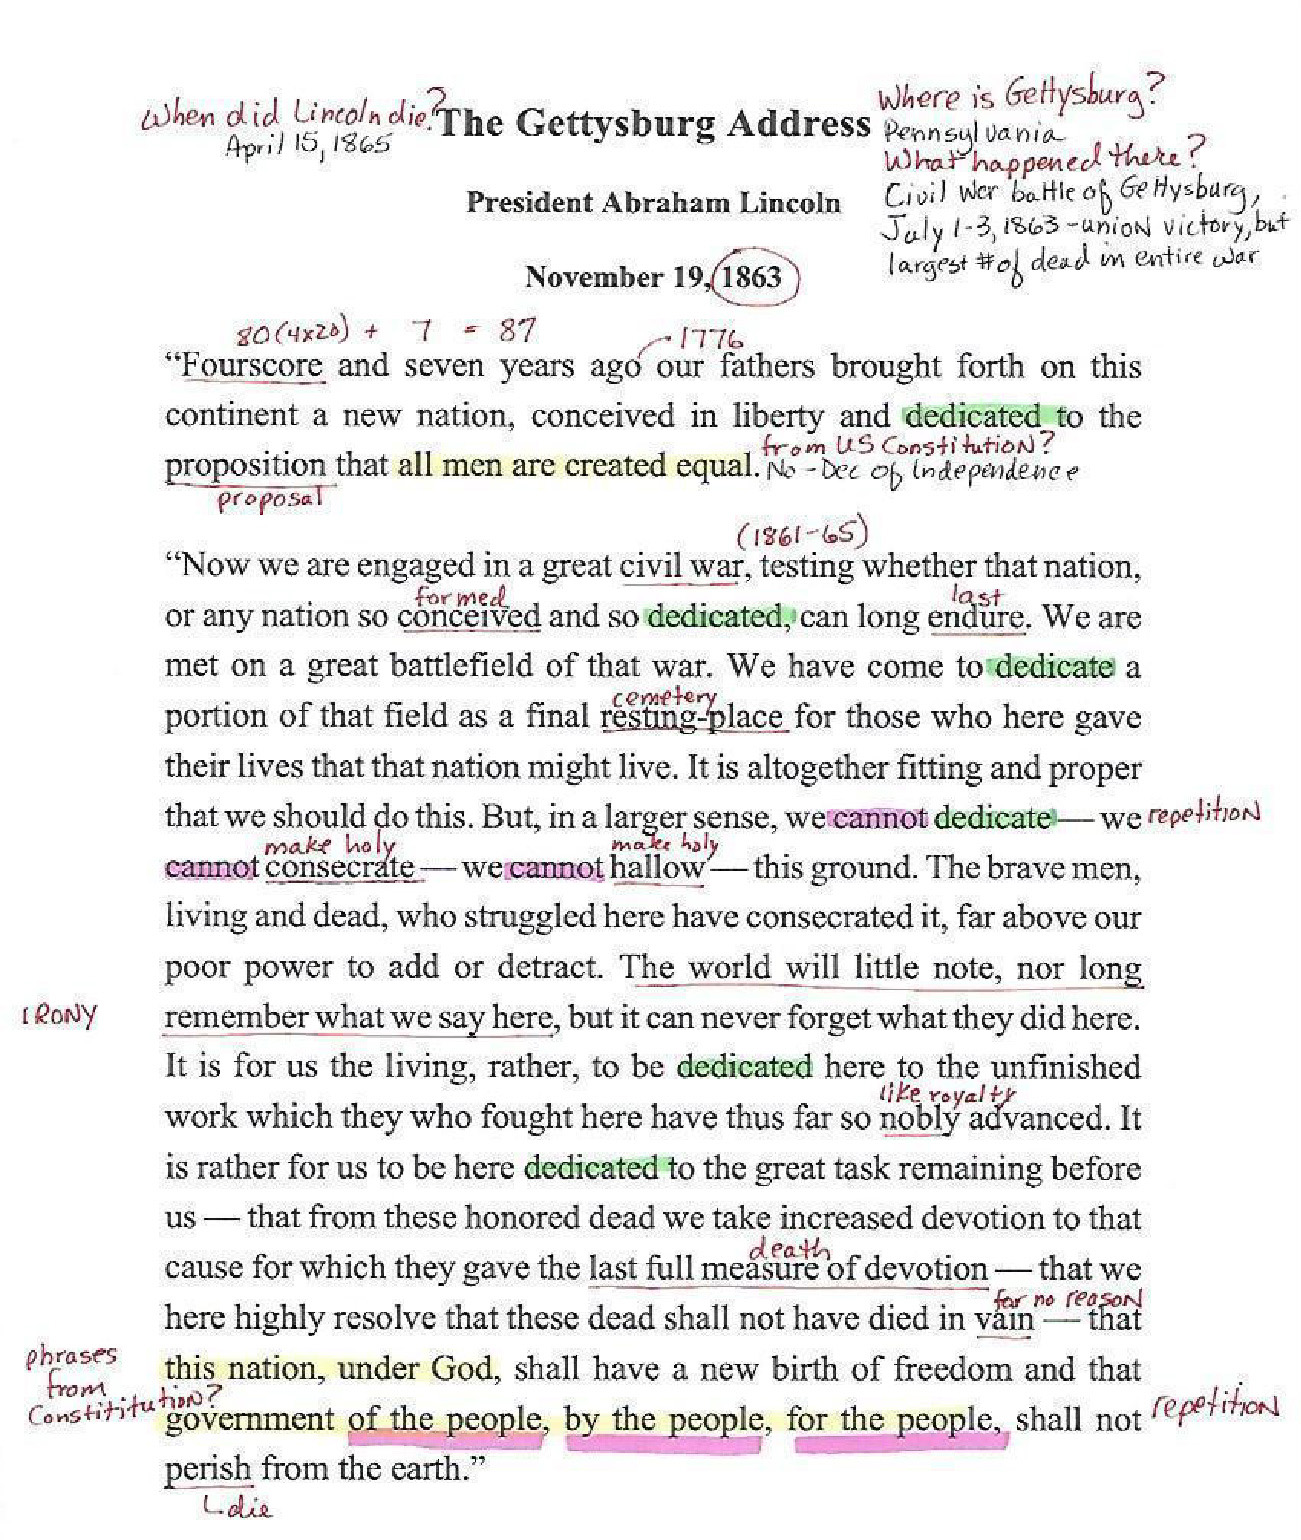
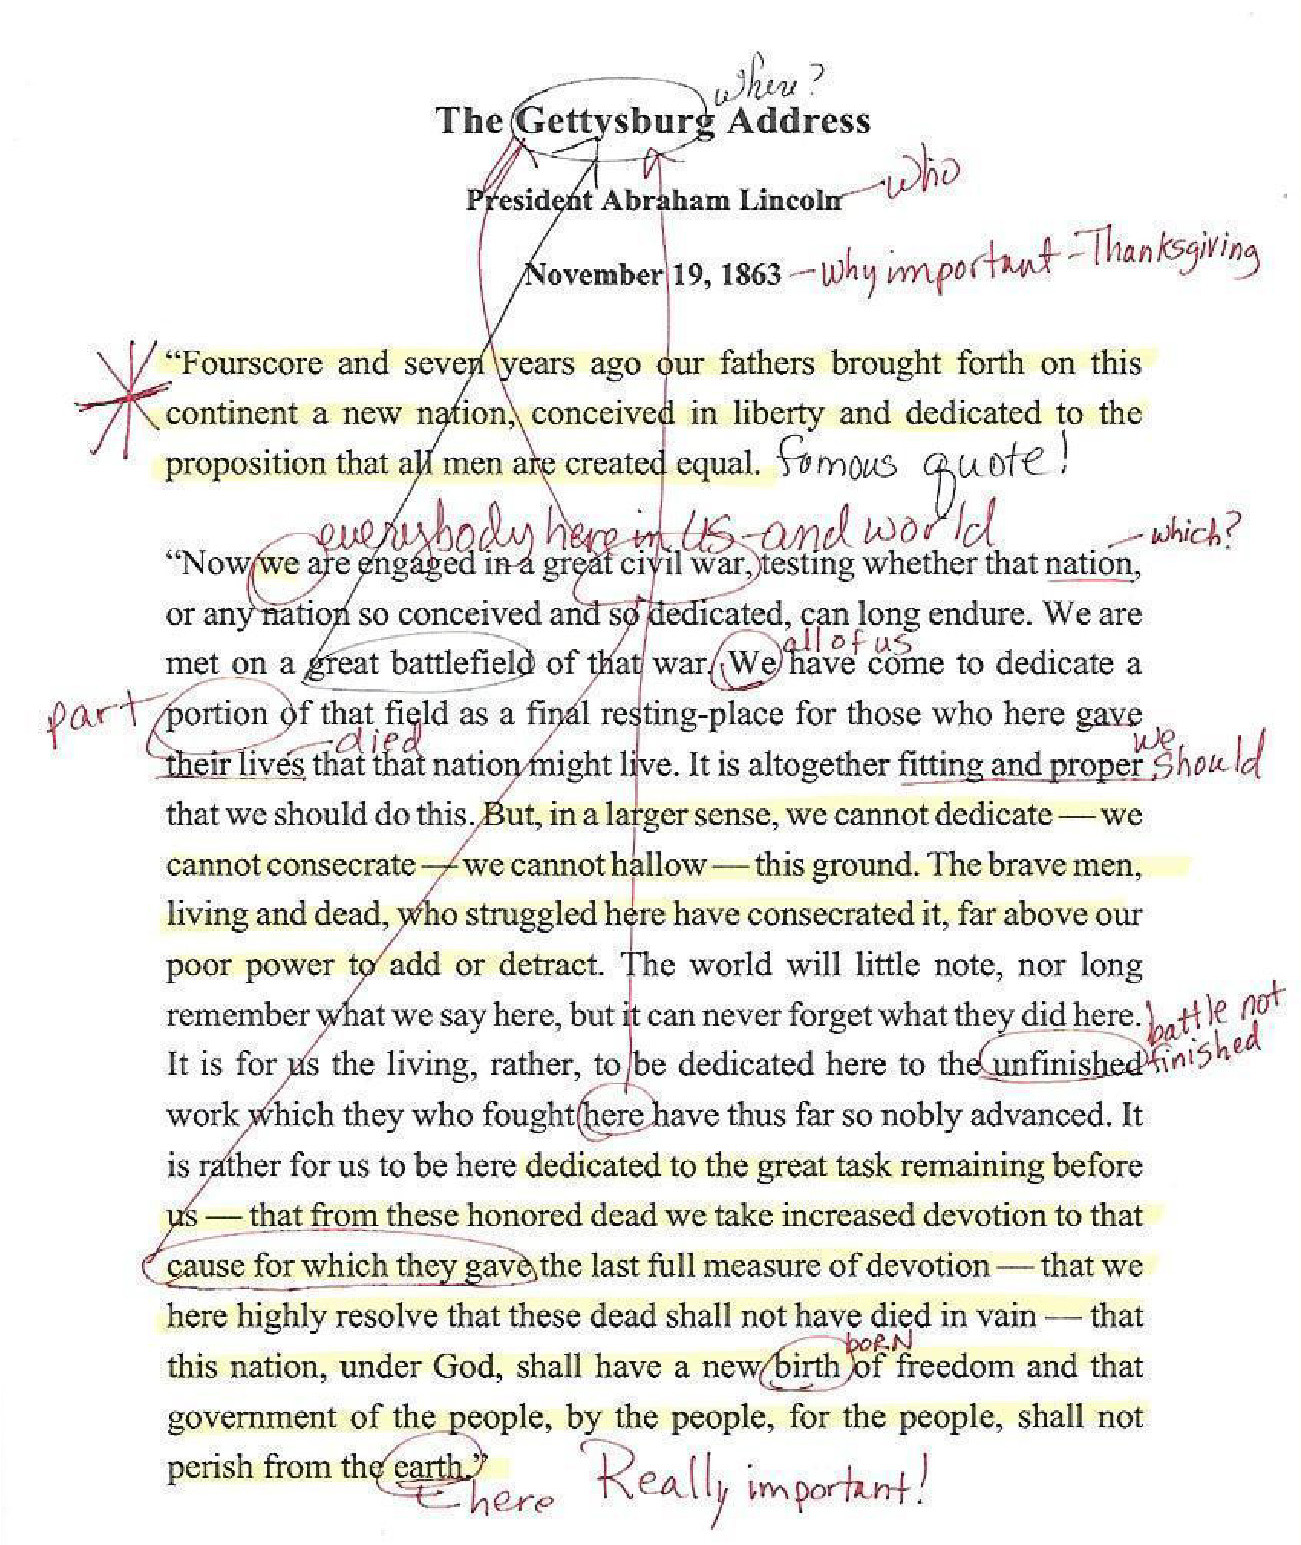
What you have to keep in the front of your mind while you are annotating, especially if you are going to conduct multiple annotation sessions, is to not overdo whatever method you use. Be judicious about what you annotate and how you do it on the page, which means you must be neat about it. Otherwise, you end up with a mess of either color or symbols combined with some cryptic notes that probably took you quite a long time to create, but won’t be worth as much to you as a study aid as they could be. This is simply a waste of time and effort.
You cannot eat up every smidgen of white space on the page writing out questions or summaries and still have a way to read the original text. If you are lucky enough to have a blank page next to the beginning of the chapter or section you are annotating, use this, but keep in mind that when you start writing notes, you aren’t exactly sure how much space you’ll need. Use a decipherable shorthand and write only what you need to convey the meaning in very small print. If you are annotating your own notes, you can make a habit of using only one side of the paper in class, so that if you need to add more notes later, you could use the other side. You can also add a blank page to your notes before beginning the next class date in your notebook so you’ll end up with extra paper for annotations when you study.
Professional resources may come with annotations that can be helpful to you as you work through the various documentation requirements you’ll encounter in college as well. Purdue University’s Online Writing Lab (OWL) provides an annotated sample for how to format a college paper according to guidelines in the Modern Language Association (MLA) manual that you can see, along with other annotations.
Adding Needed Additional Explanations to Notes
Marlon was totally organized and ready to take notes in a designated course notebook at the beginning of every philosophy class session. He always dated his page and indicated what the topic of discussion was. He had various colored highlighters ready to denote the different note purposes he had defined: vocabulary in pink, confusing concepts in green, and note sections that would need additional explanations later in yellow. He also used his own shorthand and an impressive array of symbols to indicate questions (red question mark), highly probable test material (he used a tiny bomb exploding here), additional reading suggestions, and specific topics he would ask his instructor before the next class. Doing everything so precisely, Marlon’s methods seemed like a perfect example of how to take notes for success. Inevitably though, by the end of the hour-and-a-half class session, Marlon was frantically switching between writing tools, near to tears, and scouring his notes as waves of yellow teased him with uncertainty. What went wrong?
As with many of us who try diligently to do everything we know how to do for success or what we think we know because we read books and articles on success in between our course work, Marlon is suffering from trying to do too much simultaneously. It’s an honest mistake we can make when we are trying to save a little time or think we can multitask and kill two birds with one stone.
Unfortunately, this particular error in judgement can add to your stress level exponentially if you don’t step back and see it for what it is. Marlon attempted to take notes in class as well as annotate his notes to get them ready for his test preparation. It was too much to do at one time, but even if he could have done all those things during class, he’s missing one critical point about notetaking.
As much as we may want to hurry and get it over with, notetaking in class is just the beginning. Your instructor likely gave you a pre-class assignment to read or complete before coming to that session. The intention of that preparatory lesson is for you to come in with some level of familiarity for the topic under consideration and questions of your own. Once you’re in class, you may also need to participate in a group discussion, work with your classmates, or perform some other sort of lesson-directed activity that would necessarily take you away from taking notes. Does that mean you should ignore taking notes for that day? Most likely not. You may just need to indicate in your notes that you worked on a project or whatever other in-class event you experienced that date.
Very rarely in a college classroom will you engage in an activity that is not directly related to what you are studying in that course. Even if you enjoyed every minute of the class session and it was an unusual format for that course, you still need to take some notes. Maybe your first note could be to ask yourself why you think the instructor used that unique teaching strategy for the class that day. Was it effective? Was it worth using the whole class time? How will that experience enhance what you are learning in that course?
If you use an ereader or ebooks to read texts for class or read articles from the Internet on your laptop or tablet, you can still take effective notes. Depending on the features of your device, you have many choices. Almost all electronic reading platforms allow readers to highlight and underline text. Some devices allow you to add a written text in addition to marking a word or passage that you can collect at the end of your notetaking session. Look into the specific tools for your device and learn how to use the features that allow you to take notes electronically. You can also find apps on devices to help with taking notes, some of which you may automatically have installed when you buy the product. Microsoft’s OneNote, Google Keep, and the Notes feature on phones are relatively easy to use, and you may already have free access to those.
Taking Notes on Non-Text Items (i.e., Tables, Maps, Figures, etc.)
You may also encounter situations as you study and read textbooks, primary sources, and other resources for your classes that are not actually texts. You can still take notes on maps, charts, graphs, images, and tables, and your approach to these non-text features is similar to when you prepare to take notes over a passage of text. For example, if you are looking at the following map, you may immediately come up with several questions. Or it may initially appear overwhelming. Start by asking yourself these questions:
What is the main point of this map?
- Who is the intended audience?
- Where is it?
- What time period does it depict?
- What does the map’s legend (the explanation of symbols) include?
- What other information do I need to make sense of this map?

You may want to make an extra copy of a graphic or table before you add annotations if you are dealing with a lot of information. Making sense of all the elements will take time, and you don’t want to add to the confusion.
Returning to Your Notes
Later, as soon as possible after the class, you can go back to your notes and add in missing parts. Just as you may generate questions as you’re reading new material, you may leave a class session or lecture or activities with many questions. Write those down in a place where they won’t get lost in all your other notes.
The exact timing of when you get back to the notes you take in class or while you are reading an assignment will vary depending on how many other classes you have or what other obligations you have in your daily schedule. A good starting place that is also easy to remember is to make every effort to review your notes within 24 hours of first taking them. Longer than that and you are likely to have forgotten some key features you need to include; must less time than that, and you may not think you need to review the information you so recently wrote down, and you may postpone the task too long.
Use your phone or computer to set reminders for all your note review sessions so that it becomes a habit and you keep on top of the schedule.
Your personal notes play a significant role in your test preparation. They should enhance how you understand the lessons, textbooks, lab sessions, and assignments. All the time and effort you put into first taking the notes and then annotating and organizing the notes will be for naught if you do not formulate an effective and efficient way to use them before sectional exams or comprehensive tests.
The whole cycle of reading, notetaking in class, reviewing and enhancing your notes, and preparing for exams is part of a continuum you ideally will carry into your professional life. Don’t try to take short cuts; recognize each step in the cycle as a building block. Learning doesn’t end, which shouldn’t fill you with dread; it should help you recognize that all this work you’re doing in the classroom and during your own study and review sessions is ongoing and cumulative. Practicing effective strategies now will help you be a stronger professional.
Activity
What resources can you find about reading and notetaking that will actually help you with these crucial skills? How do you go about deciding what resources are valuable for improving your reading and notetaking skills?
The selection and relative value of study guides and books about notetaking vary dramatically. Ask your instructors for recommendations and see what the library has available on this topic. The following list is not comprehensive, but will give you a starting point for books and articles on notetaking in college.
- College Rules!: How to Study, Survive, and Succeed in College, by Sherri Nist-Olejnik and Jodi Patrick Holschuh. More than just notetaking, this book covers many aspects of transitioning into the rigors of college life and studying.
- Effective Notetaking, by Fiona McPherson. This small volume has suggestions for using your limited time wisely before, during, and after notetaking sessions.
- How to Study in College, by Walter Pauk. This is the book that introduced Pauk’s notetaking suggestions we now call the Cornell Method. It is a bit dated (from the 1940s), but still contains some valuable information.
- Learn to Listen, Listen to Learn 2: Academic Listening and Note-taking, by Roni S. Lebauer. The main point of this book is to help students get the most from college lectures by watching for clues to lecture organization and adapting this information into strong notes.
- Study Skills: Do I Really Need this Stuff?, by Steve Piscitelli. Written in a consistently down-to-earth manner, this book will help you with the foundations of strong study skills, including time management, effective notetaking, and seeing the big picture.
- “What Reading Does for the Mind,” by Anne Cunningham and Keith Stanovich, 1998, https://www.aft.org/sites/default/files/periodicals/cunningham.pdf
- Adler, Mortimer J. and Charles Van Doren. How to Read a Book: The Classic Guide to Intelligent Reading. NY: Simon & Schuster, 1940.
- Berns, Gregory S., Kristina Blaine, Michael J. Prietula, and Brandon E. Pye. Brain Connectivity. Dec 2013.ahead of print http://doi.org/10.1089/brain.2013.0166


